Array Editable Regions A designated area within a webpage where Organization Members can add, remove, and reorder array values in CloudCannon's Visual Editor. Array Editable Regions work with arrays stored in structured data or front matter that populate templating in your layout files, and support editing array components and page building. A designated area marking a single item inside an Array Editable Region, which Organization Members can move, duplicate, or remove in CloudCannon's Visual Editor, or use to add a new item after it. Each Array Item Editable Region must sit within an Array Editable Region, and can contain nested Editable Regions for editing the content of that item.Array Editable Region
Array Item Editable Region
To avoid misconfiguration issues where CloudCannon cannot find the data property you want to edit, always add Editable Regions to values closest to the root of the file first (i.e., work from parent elements towards child elements).
Array Editable Regions support two kinds of array. In a simple array, every array item has the same structure, such as a list of testimonials that each have an image, a name, and a quote. In a complex array, array items have different structures, such as a list of page-building blocks where each array item is a different component.
These instructions assume you have configured your build settings and are comfortable editing HTML layouts, either in CloudCannon's Source Editor or your local development environment.
If you have a complex array, you also need to install the Editable Regions integration for your SSG and register each type of array item as a component before you begin. CloudCannon provides this integration for Astro, Eleventy, and Hugo, and a root component for sites built with React, Vue, or Svelte, including Next.js, Nuxt, and SvelteKit. For more information, please read our documentation on configuring Component Editable Regions.
To configure Array Editable Regions in the Visual Editor:
- Identify the file to which you want to add an Array Editable Region.
- Open the file in CloudCannon's Source Editor or your local development environment.
- Identify the templating responsible for looping over your array and add the
data-editable="array"HTML attribute to the element that wraps it. If no appropriate tags are available, wrap the templating in the<editable-array>web component. - Add the
data-prop=""HTML attribute to the same DOM element, or to the<editable-array>web component. The value ofdata-propshould be the path to the data property you want to edit. - If you have a complex array, you must add the
data-id-keyHTML attribute to the same DOM element, or to the<editable-array>web component. The value ofdata-id-keyshould be the structured data key that stores the unique identifier of each array item (e.g.,_name). - If you have a complex array, you must add the
data-component-keyHTML attribute to the same DOM element, or to the<editable-array>web component. The value ofdata-component-keyshould be the structured data key that stores the name of your component (e.g.,_name). - Identify the HTML element within your array templating that contains your array item and add the
data-editable="array-item"HTML attribute. If no appropriate tags are available, wrap the content of the array item in the<editable-array-item>web component. - If you have a complex array, you must add the
data-idHTML attribute to the same DOM element, or to the<editable-array-item>web component. The value ofdata-idshould be a templating that will populate with the value of thedata-id-keykey (e.g.,{block._name}). - If you have a complex array, you must add the
data-componentHTML attribute to the same DOM element, or to the<editable-array-item>web component. The value ofdata-componentshould be a templating that will populate with the value of thedata-component-keykey (e.g.,{block._name}). - Save your changes and rebuild your Site.
When you open the file in the Visual Editor, CloudCannon will show yellow Editable Region boxes around each array item, and around any Editable Regions inside them.
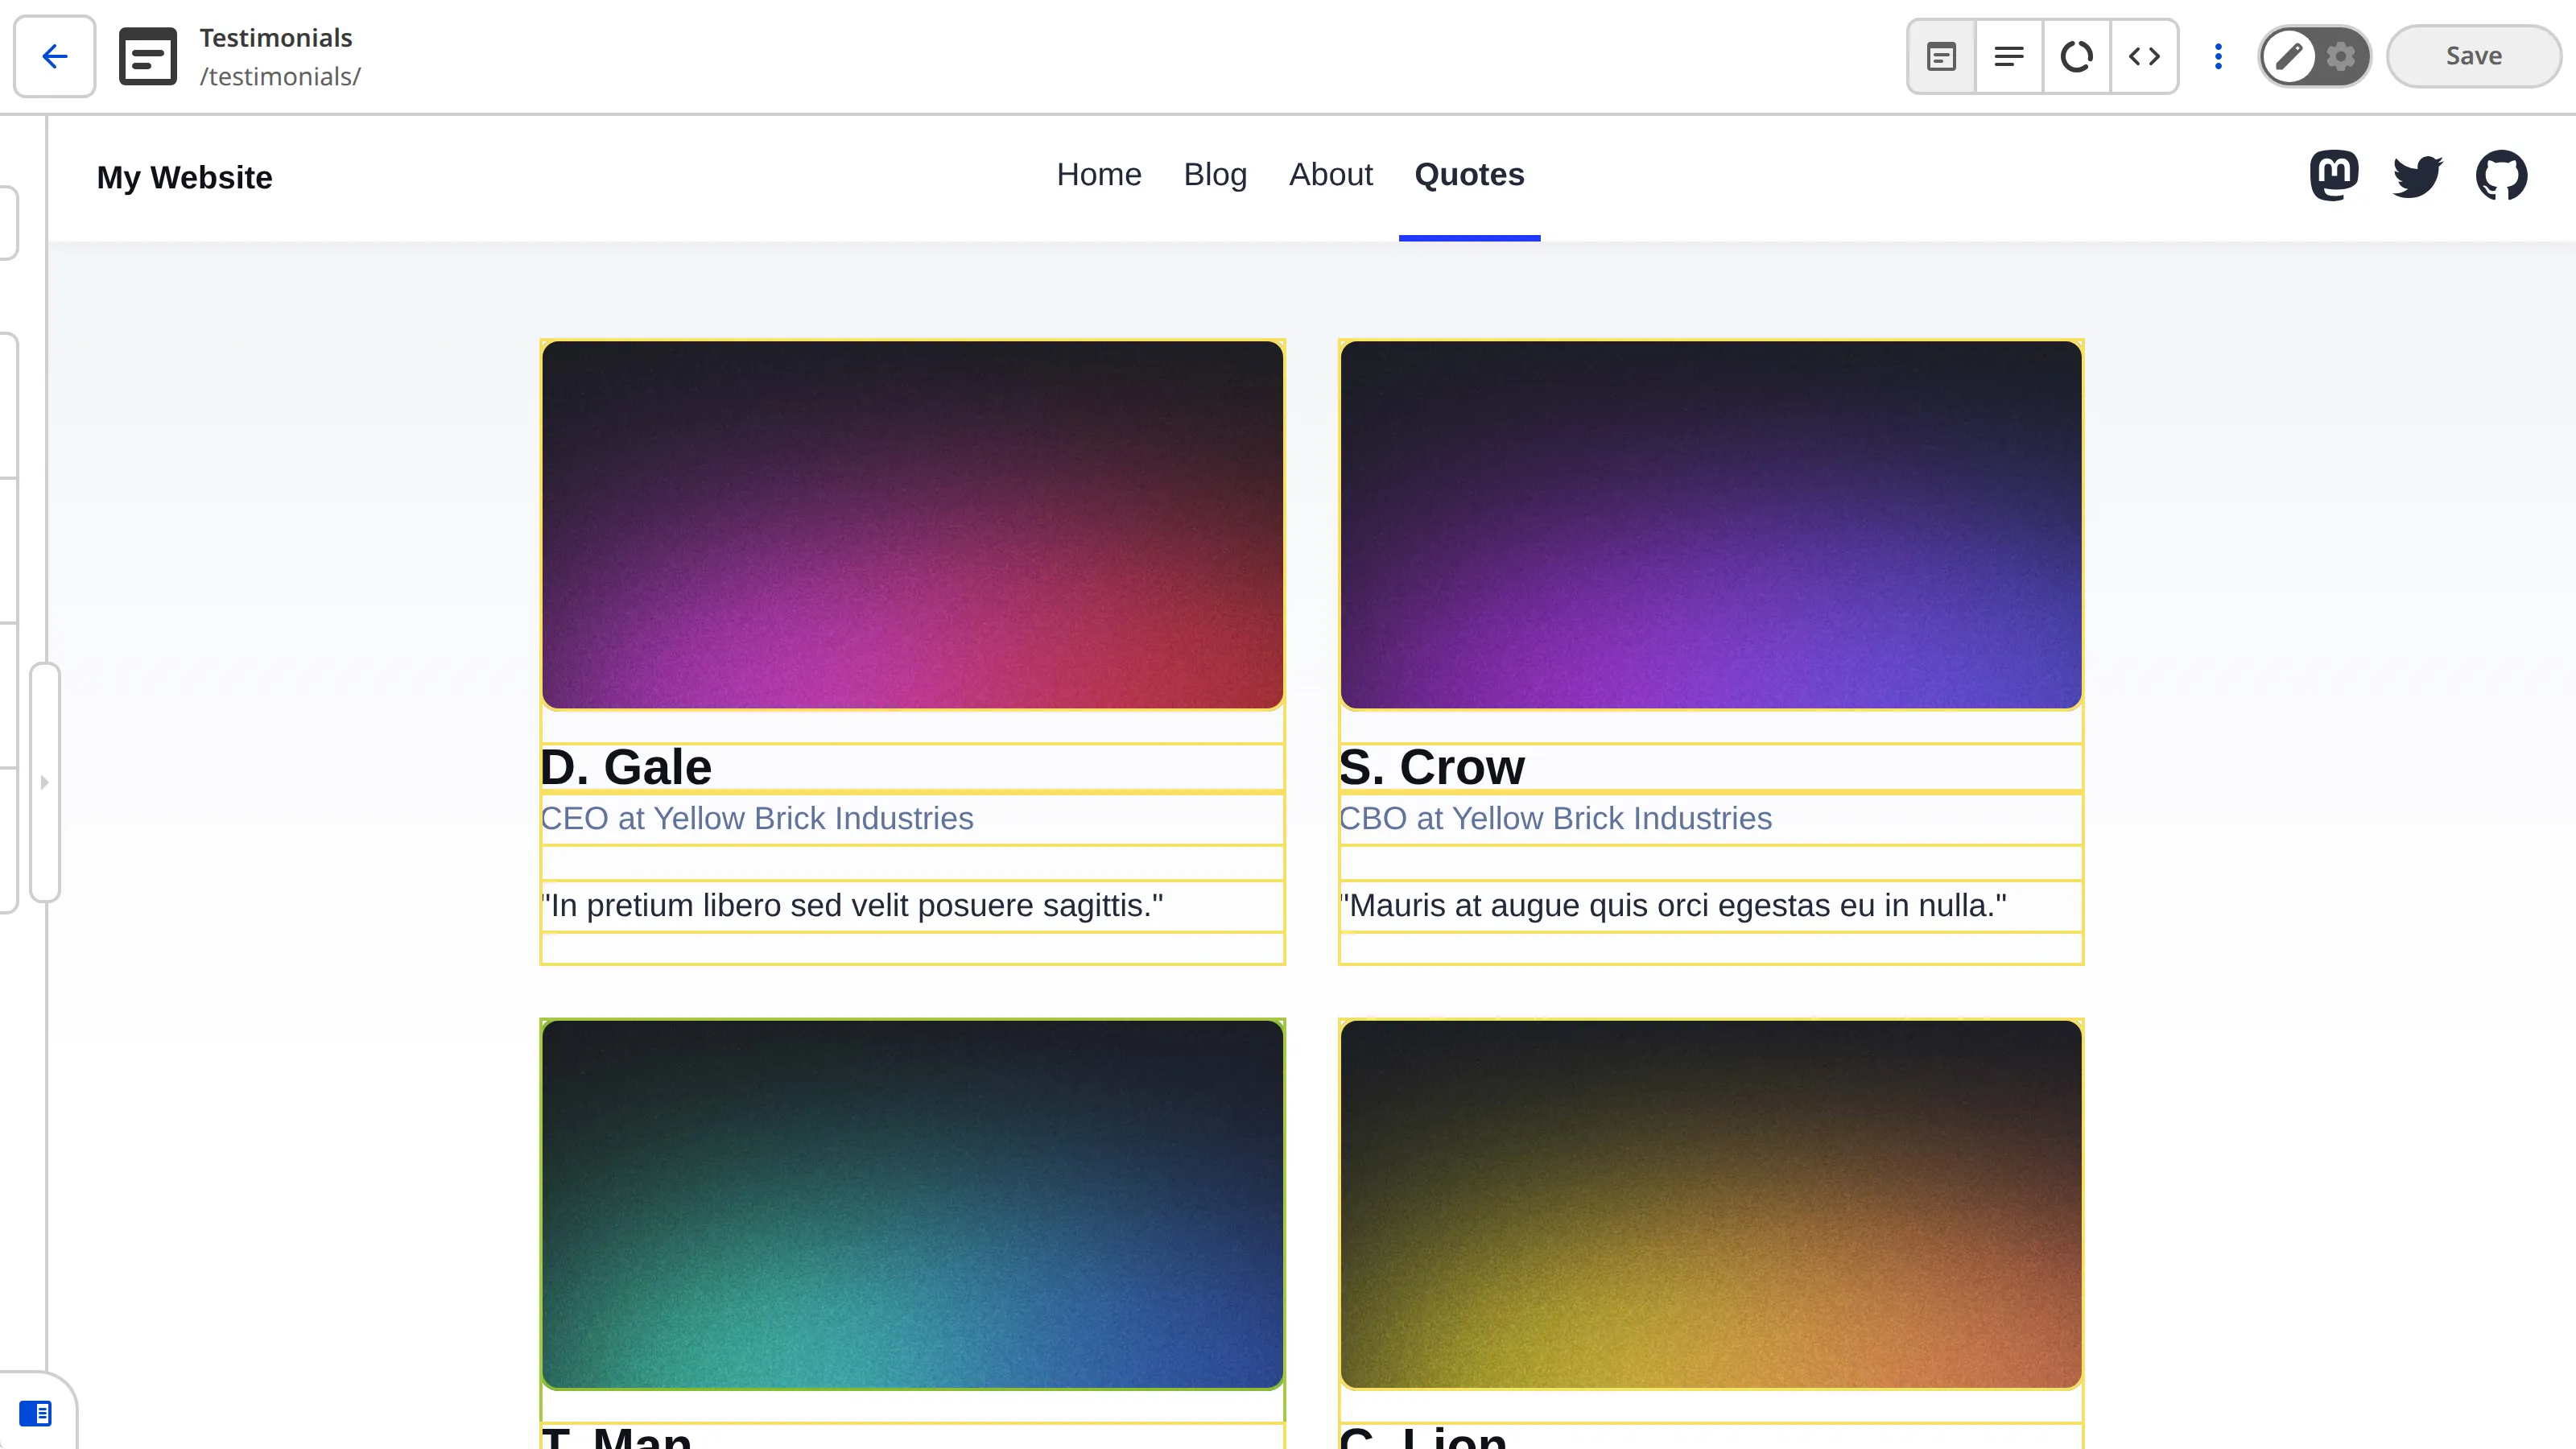
When you hover over an array item, CloudCannon will show a small toolbar in the top right of the array item, containing an edit icon and a drag handle icon. Clicking the edit icon opens a Data Panel containing the fields for that array item. Clicking the drag handle icon opens the Context Menu, with options to add, duplicate, move, and delete the array item. Clicking and holding the drag handle icon allows you to drag the array item to any position in the array.
Where should the Array and Array Item Editable Regions go?
We recommend placing the Array attribute or web component on the element that wraps your array templating, and the Array Item attribute or web component on the first element inside each loop iteration. This way, Array and Array Item flank the templating for looping over your array.
Other HTML elements can sit between the Array and Array Item Editable Regions, but another Editable Region cannot. CloudCannon matches each Array Item Editable Region to its nearest parent Editable Region, and shows an error if that parent is not an Array Editable Region.
If you also want to edit the contents of each array item in the Visual Editor, you can add Text Editable Regions or Image Editable Regions to the content inside each array item.
Examples#
Here are a few examples of different Array Editable Regions.
In this example of a simple array, the testimonials.md file contains array items with the same structure.
---
layout: ../layouts/TestimonialsLayout.astro
testimonials:
  - image: /astro-blog/blog-placeholder-2.jpg
    image_alt: Profile photo of D. Gale
    name: D. Gale
    job_title: CEO at Yellow Brick Industries
    quote: >-
      "In pretium libero sed velit posuere sagittis."
  - image: /astro-blog/blog-placeholder-3.jpg
    image_alt: Profile photo of S. Crow
    name: S. Crow
    job_title: CBO at Yellow Brick Industries
    quote: >-
      "Mauris at augue quis orci egestas eu in nulla."
  - image: /astro-blog/blog-placeholder-4.jpg
    image_alt: Profile photo of T. Man
    name: T. Man
    job_title: CHO at Yellow Brick Industries
    quote: >-
      "Nunc ut sem vitae tortor volutpat varius."
  - image: /astro-blog/blog-placeholder-5.jpg
    image_alt: Profile photo of C. Lion
    name: C. Lion
    job_title: CCO at Yellow Brick Industries
    quote: >-
      "Aenean pharetra orci ac tincidunt lobortis."
---In the TestimonialsLayout.astro layout file, the <ul> element wraps the loop over the testimonials array, so it is the Array Editable Region. Each <li> element is an Array Item Editable Region. Inside each array item, Image and Text Editable Regions let your team edit the image, name, job title, and quote.
---
const { testimonials } = Astro.props.frontmatter;
---

<!doctype html>
<html lang="en">
  <body>
    <main>
      <section>
        <ul data-editable="array" data-prop="testimonials">
          {
            testimonials.map((testimonial) => (
              <li data-editable="array-item" >
                {testimonial.image && (
                  <img
                    data-editable="image"
                    data-prop-src="image"
                    data-prop-alt="image_alt"
                    width={720}
                    height={360}
                    src={testimonial.image}
                    alt={testimonial.image_alt}
                  />
                )}
                <h4 class="name" data-editable="text" data-prop="name">{testimonial.name}</h4>
                <p class="job" data-editable="text" data-prop="job_title">{testimonial.job_title}</p>
                <p class="quote" data-editable="text" data-prop="quote">{testimonial.quote}</p>
              </li>
            ))
          }
        </ul>
      </section>
    </main>
  </body>
</html>The data-editable attribute defines what kind of data this element contains, and the data-prop attribute defines the path to the data we want to edit. In this case, we want an Array Editable Region, so the value of data-editable is array, and we want to edit the testimonials structured data key in the file front matter.
This <img> element contains data-editable="image", data-prop-src="image", and data-prop-alt="image_alt" to define an Image Editable Region.
This <h4> element contains data-editable="text" and data-prop="name" to define a Text Editable Region.
This <p> element contains data-editable="text" and data-prop="job_title" to define a Text Editable Region.
This <p> element contains data-editable="text" and data-prop="quote" to define a Text Editable Region.
In this example of a complex array, the about.md file contains array items with different structures. Each content block is rendered by a different component, so the registration script registers each component under the same name stored in the _name key.
import { registerAstroComponent } from '@cloudcannon/editable-regions/astro';
import '@cloudcannon/editable-regions/astro-react-renderer';
import HeroBlock from '../components/HeroBlock.astro';
import StatsBlock from '../components/StatsBlock.astro';
import ContactBlock from '../components/ContactBlock.astro';

// Register your components
registerAstroComponent('HeroBlock', HeroBlock);
registerAstroComponent('StatsBlock', StatsBlock);
registerAstroComponent('ContactBlock', ContactBlock);This import is only necessary if you use React components nested inside your Astro components.
---
layout: ../layouts/AboutLayout.astro
contentBlocks:
  - _name: HeroBlock
    title: We're on a mission
    description: Lorem ipsum dolor sit amet, consectetur adipiscing elit. Fusce lobortis mi sed est dapibus, sit amet consectetur quam euismod. Cras pretium quam vitae malesuada placerat. Curabitur ac sagittis ligula. Nunc sed ultrices leo. Vestibulum malesuada lobortis nisl, a feugiat est viverra et.
  - _name: StatsBlock
    stats:
      - figure: $200m
        text: Venture capital raised
      - figure: "2016"
        text: Established in
      - figure: 40+
        text: Amazing team members
      - figure: 44325+
        text: Active users and growing
  - _name: ContactBlock
    text: Want to get in contact with us?
    button: Click here
    image: https://preview.astro.new/blog/_astro/blog-placeholder-about.BtEdEmGp_1cKsnD.webp
---In the AboutLayout.astro layout file, the <main> element is the Array Editable Region. Its data-id-key and data-component-key HTML attributes both point to the _name key, which stores the unique identifier of each content block and the name of its registered component. Each <section> element is an Array Item Editable Region, with data-id and data-component HTML attributes that populate with the value of _name at build time.
---
const components = {};
const componentImports = import.meta.glob("../components/**/*.astro", {
  eager: true,
});
Object.entries(componentImports).forEach(([path, obj]) => {
  const name = path.replace("../components/", "").split(".")[0];
  components[name] = obj.default;
});

const { contentBlocks } = Astro.props.frontmatter;
---

<main data-editable="array" data-prop="contentBlocks" data-id-key="_name" data-component-key="_name">
  {
    contentBlocks.map((block) => {
      const Component = components[block._name];
      return (
        <section data-editable="array-item" data-id={block._name} data-component={block._name}>
          <Component {...block} />
        </section>
      );
    })
  }
</main>The data-id-key and data-component-key attributes tell CloudCannon to read the identifier and component name of each array item from the _name key.
The data-id and data-component attributes populate with the value of _name for each array item at build time (e.g., HeroBlock).
Render new array items#
When you add an array item in the Visual Editor, CloudCannon needs markup to display the new array item before your Site rebuilds. CloudCannon uses the first of the following that your Array Editable Region provides:
- A
<template>element inside your Array Editable Region. A<template>element without adata-idHTML attribute is the markup for every new array item. To use different markup for each type of array item, add adata-idHTML attribute to each<template>element, matching a value of the key named bydata-id-key. If a<template>element contains more than one root element, CloudCannon wraps its contents in an<editable-array-item>web component. CloudCannon addsdata-editable="array-item"to the root element of each new array item, so you don't need to include it in your<template>element. - A registered component, named by the
data-component-keyHTML attribute for each array item, or by thedata-componentHTML attribute on the Array Editable Region as a fallback for every array item. - A copy of an existing array item. For a complex array, CloudCannon only copies an existing array item with the same
data-id.
In this example, the <template> element gives CloudCannon the markup for new testimonials, so your team can add a testimonial even when the array is empty.
<ul data-editable="array" data-prop="testimonials">
  <template>
    <li data-editable="array-item">
      <h4 class="name" data-editable="text" data-prop="name"></h4>
      <p class="quote" data-editable="text" data-prop="quote"></p>
    </li>
  </template>
  {
    testimonials.map((testimonial) => (
      <li data-editable="array-item">
        <h4 class="name" data-editable="text" data-prop="name">{testimonial.name}</h4>
        <p class="quote" data-editable="text" data-prop="quote">{testimonial.quote}</p>
      </li>
    ))
  }
</ul>For more information about <template>, data-component, and data-component-key, please read our documentation on Editable Region HTML attributes.
Match the direction of your array#
The array item controls in the Visual Editor follow the direction of your array. For a vertical array, the Context Menu shows Move up and Move down options, and for a horizontal array it shows Move left and Move right options. CloudCannon also uses the direction to show where an array item will land when you drag it.
To set the direction, add the data-direction HTML attribute to your Array Editable Region, with a value of row, column, row-reverse, or column-reverse. If you do not define data-direction, CloudCannon uses the flex-direction of your Array Editable Region when it has display: flex, and column otherwise.
<ul data-editable="array" data-prop="testimonials" data-direction="row"> The data-direction attribute tells CloudCannon this array is horizontal, so the Context Menu shows Move left and Move right options.
Use the array length and item position#
Array and Array Item Editable Regions provide two values from the structure of your array, rather than from your data. An Array Editable Region provides @length, the number of items in the array. An Array Item Editable Region provides @index, the position of that item. You can reference either value from an Editable Region nested inside, using data-prop or a data-prop-* HTML attribute.
<ul data-editable="array" data-prop="testimonials">
  {
    testimonials.map((testimonial, index) => (
      <li data-editable="array-item">
        <editable-component data-component="testimonial_card" data-prop-position="@index">
          <TestimonialCard {...testimonial} position={index} />
        </editable-component>
      </li>
    ))
  }
</ul>The data-prop-position attribute passes the position of each array item to the registered testimonial_card component under the position key.
Misconfigured Array Editable Regions#
If your Array Editable Region is misconfigured, CloudCannon will replace it in the Visual Editor with a red Error Card headed Failed to render array editable, or Failed to render array item for a misconfigured Array Item Editable Region, followed by a message describing the problem. If CloudCannon cannot render a new array item, the heading is Failed to render array editable region for a simple array, or Failed to render array item for a complex array.
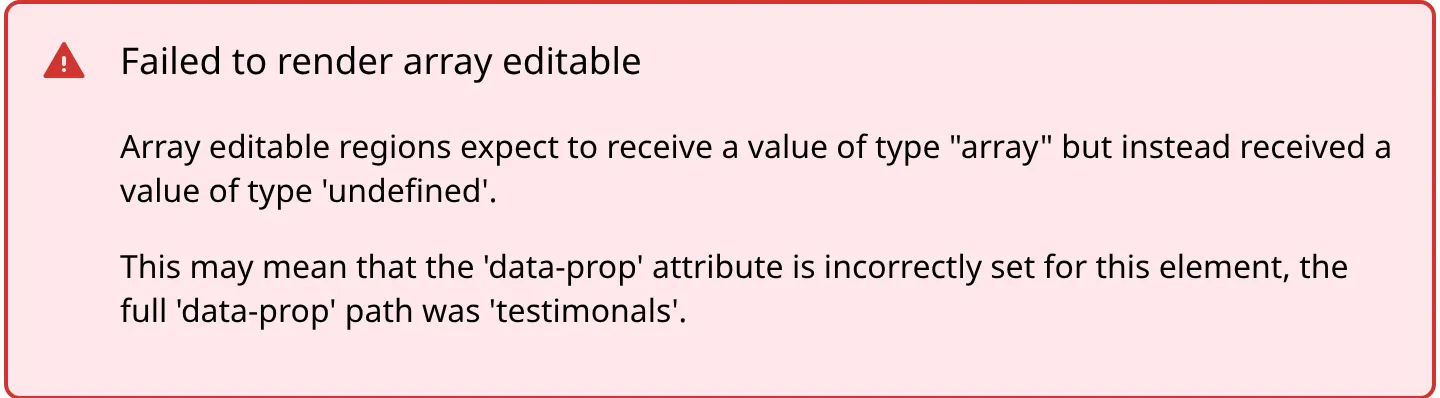
Array Editable Regions are misconfigured if:
- You did not define the
data-propHTML attribute. - The value at the
data-proppath is not an array (e.g., it is a string, a number, or an object, or no value exists at that path). - You have one or more orphaned Array Item Editable Regions whose nearest parent Editable Region is not an Array Editable Region.
- You did not define the
data-id-keyordata-idHTML attributes for a complex array. - CloudCannon cannot render a new array item, because your Array Editable Region has no
<template>element, nodata-componentordata-component-keyHTML attribute, and no existing array item it can copy.