DNS Records Domain Name System (DNS) records, the instructions for a domain about its IP address, email routing, owner validation, and more. An authoritative nameserver manages a domain's DNS records. A domain you own and connect to your CloudCannon Organization, so visitors reach your Site at your own address instead of its Testing Domain. You buy the domain from a domain registrar, connect it to your Organization, then add it to your Sites. A DNS Provider option where CloudCannon manages the DNS records of your Custom Domain. CloudCannon adds the records each Subdomain needs, and the TXT records for your SSL Certificates, for you. To use it, you replace the nameservers at your domain registrar with CloudCannon's nameservers.DNS Records
Custom Domain
CloudCannon DNS
This article covers Custom Domains on CloudCannon DNS. On External DNS Domain Name System configuration managed by a third-party DNS Provider rather than CloudCannon DNS. External DNS allows you to host your Site on CloudCannon but manage your DNS records elsewhere, such as with Cloudflare or on your own servers. You add the DNS records CloudCannon lists for each Subdomain at your DNS Provider. The service that stores the DNS records for your Custom Domain and answers DNS questions about it. This can be CloudCannon DNS, your domain registrar, or another service such as Cloudflare. You choose the DNS Provider when you connect a Custom Domain, and you can change it later in Domain Settings.External DNS
DNS Provider
Before we begin, this article assumes your Custom Domain uses CloudCannon DNS. For more information, please read our documentation on configuring CloudCannon DNS.
Add DNS Records#
The Add record button is disabled until the DNS zone for your domain is ready, or if you don't have the base-domain:settings:dns:write permission. Hover over the disabled button to see why.
To add a DNS Record:
- Log in to CloudCannon.
- Select the Organizationyour Custom Domain is connected to.Glossary term
Organization
A workspace in CloudCannon that groups together Sites, Organization Members, and shared resources. It is also the unit CloudCannon bills for. You can define permissions for your Organization, controlling the access each Organization Member has to resources on CloudCannon. You can create and be a part of multiple Organizations.
- Click the Custom Domains link in the App Sidebar. CloudCannon will open the Domains BrowserGlossary term
App Sidebar
The left-most UI panel in the CloudCannon app. This panel contains links to your Organization Home, Sites, Projects, Domains, and Org Settings pages, as well as app Updates and your Avatar.
.Glossary termDomains Browser
The page where you manage the Custom Domains connected to your Organization. The Domains Browser allows you to connect new domains and open the Domain page for each one to manage its Subdomains, DNS records, SSL Certificates, and minimum TLS version. You can access the Domains Browser by clicking the Custom Domains link in the App Sidebar.
- Select the domain for which you want to add a record by clicking the Cardfor the domain. CloudCannon will open the Summary tab of the Domain page.Glossary term
Card
The repeated block CloudCannon uses to represent one item in a list, browser, or input, typically showing a preview image, title, subtitle, icon, and key metadata. Cards represent files and folders in the Collection Browser and File Browser, as well as Sites, Organizations, Organization Members, domains, Health Checks, and items inside Array and Object Inputs. You can configure how Cards look for your files, making it easier to browse and identify content at a glance.
- Click the DNS tab. CloudCannon will open the DNS tab, which lists your records in the DNS records section.
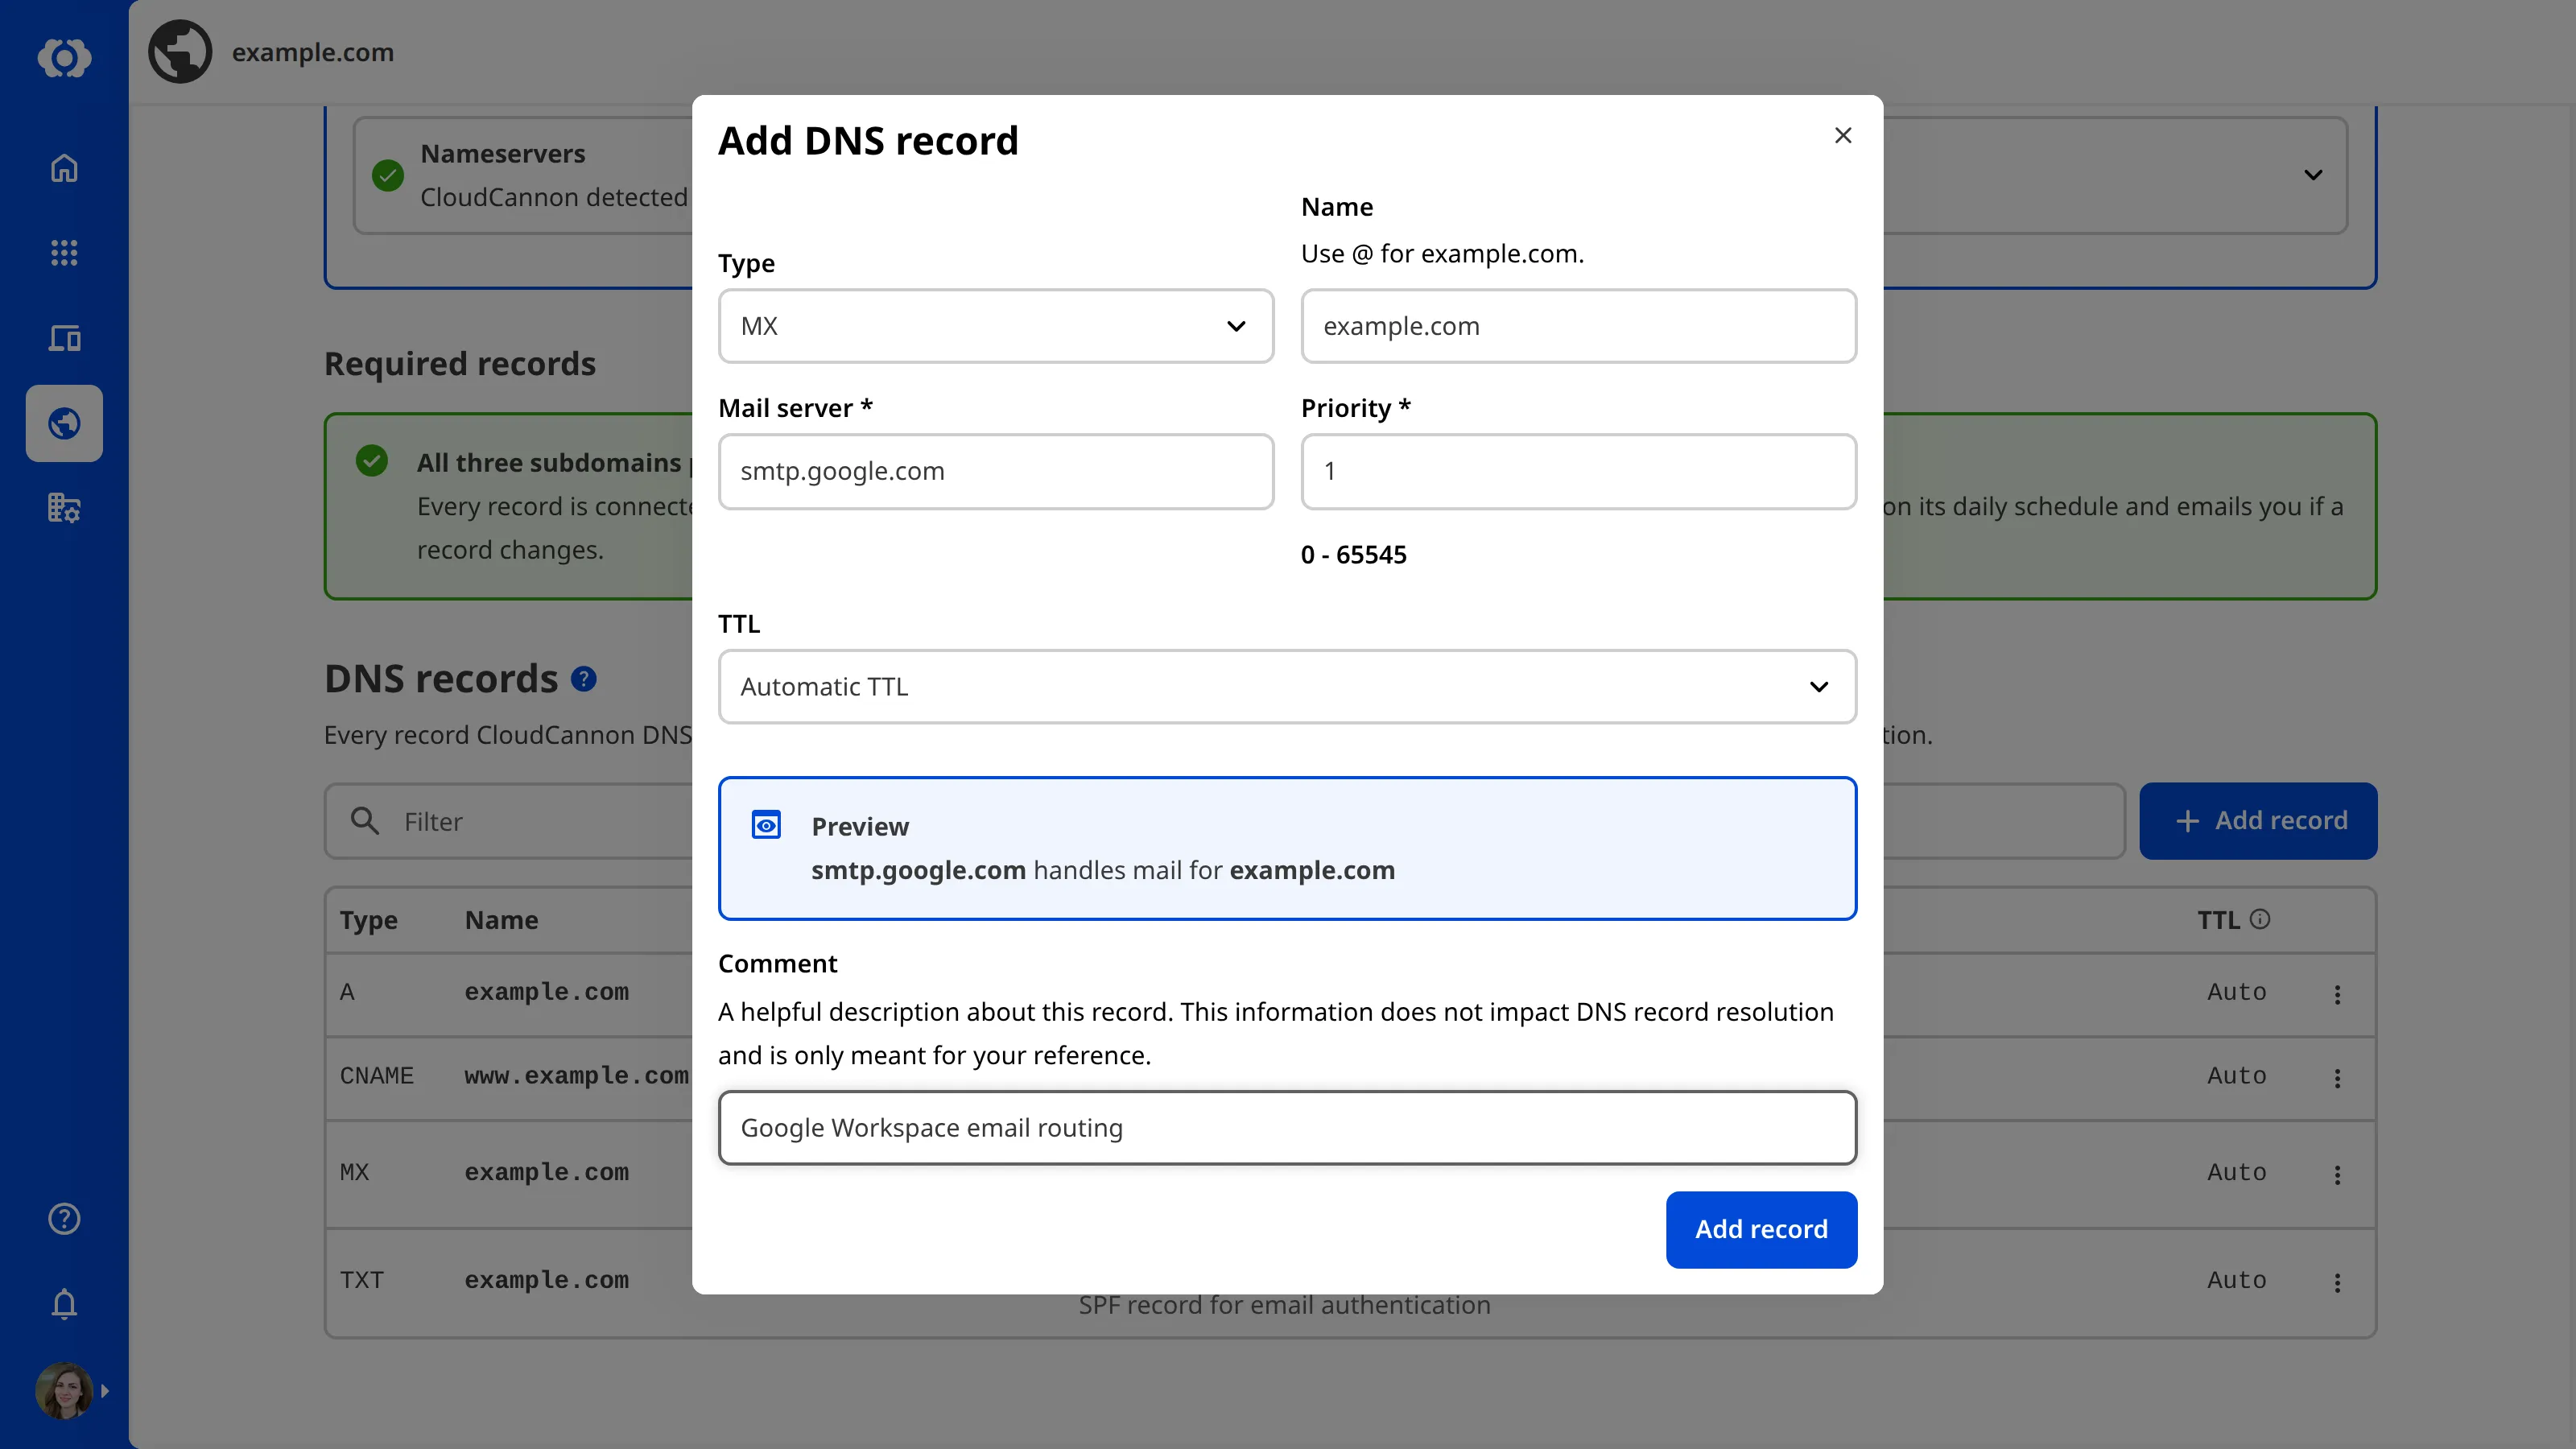
- Click the Add record button. CloudCannon will open the Add DNS record modal.
- Use the Type dropdown to select the type of record. Valid options include A, AAAA, CNAME, MX, SRV, TXT, and NS. CloudCannon will update the available fields depending on the record type.
- Enter the details for your DNS Record.
- (Optional.) Enter a description of the record in the Comment field.
- Click the Add record button.
CloudCannon will add the DNS Record to the DNS zone for your domain and list it in the DNS records section.
Edit or delete DNS Records#
The DNS records section on the DNS tab lists the Type, Name, Content, and TTL of each record. Type in the Filter field to find a record.
To edit or delete a DNS Record, click the Context Menu A menu that appears when you click the six-dot icon in the top right of a File Card or three-dot icon in the top right of an Editing Interface. This menu provides quick access to file actions and options such as previewing a file live on your website, cloning or renaming a file, and more.Context Menu
base-domain:settings:dns:write permission, the Context Menu only has the View option.
Records CloudCannon adds#
When CloudCannon creates the DNS zone for your domain, it adds two CNAME Records:
*.example.comis an alias forsites.cloudcannon.comexample.comis an alias forsites.cloudcannon.com
These records instruct servers completing a DNS lookup for your Base Domain The primary domain name for a website, without any subdomains. For example, in "www.example.com", the Base Domain is "example.com". In CloudCannon, you connect your Base Domain to your Organization as a Custom Domain. An additional name on the front of your URL, prefixing your Base Domain name (e.g., "docs" in docs.example.com or "blog" in blog.example.com). In CloudCannon, every address on your Custom Domain, including the Base Domain itself, is a Subdomain with its own hosting, HTTPS, and DNS settings. Each Subdomain serves Sites, each at its own path, or redirects visitors to another domain. A Subdomain with no Site yet shows its visitors a 404 page until you add a Site. A website in CloudCannon that includes all the files, content, configuration, and settings needed to edit, build, and host a complete website.Base Domain
Subdomain
sites.cloudcannon.com. These records let visitors' browsers find the IP address of the CloudCannon server that hosts your SiteSite
docs.example.com, but not api.docs.example.com). A Subdomain the wildcard record doesn't serve needs its own record, which you can add with the Fix button.
If you migrated from the legacy CloudCannon DNS, CloudCannon copies your existing records into the new zone as well. If CloudCannon is restoring a zone that Cloudflare deleted, it restores the copy of your records instead of adding these two records.
If an SSL Certificate A digital certificate that proves your website's identity and lets visitors connect to it over HTTPS. On CloudCannon, each Subdomain of your Custom Domain has its own SSL Certificate, which covers every Site on that Subdomain. An SSL Certificate can be auto-generated by CloudCannon, or a Custom SSL Certificate you upload.SSL Certificate
Fix the DNS Record for a Subdomain#
Fixing a record requires the base-domain:settings:dns:write permission. Without it, the Fix button is disabled, and hovering over it shows You do not have permission to edit the DNS for [Base Domain].
The Required records section on the DNS tab lists the Subdomains on your Custom Domain whose DNS Record still needs a change. For each of these Subdomains, the table shows:
- Subdomain — The Subdomain. Click it to open the Subdomain page.
- Record — The record the Subdomain needs to reach CloudCannon, followed by the records CloudCannon found for it. If the wildcard record for your Base Domain serves the Subdomain, the needed record reads Served by the *.example.com wildcard. The needed record is marked Configured once CloudCannon finds it, a found record that points somewhere else is marked Points elsewhere, and other records at the same name are marked Existing.
- Status — Not pointing at CloudCannon if a record points somewhere else, No DNS Record if CloudCannon found nothing, Checking while a new record is still spreading, or Not checked yet.
When every Subdomain reaches CloudCannon, the section shows [Subdomain] points at CloudCannon, Both subdomains point at CloudCannon, or All [Number] subdomains point at CloudCannon, and says there is nothing to add. The DNS section of each Subdomain page shows the record for that Subdomain, whether or not it needs a change.
The footer of the table says when CloudCannon last checked the records. Click the Check now button in the footer to check every listed Subdomain again.
The Required records section is hidden until your nameservers A server involved in the DNS lookup process. The word "nameserver" typically refers to the authoritative nameserver, which manages all the DNS records for a particular domain name. Almost all domains rely on multiple authoritative nameservers for redundancy. To use CloudCannon DNS, you set CloudCannon's nameservers at your domain registrar.Nameserver
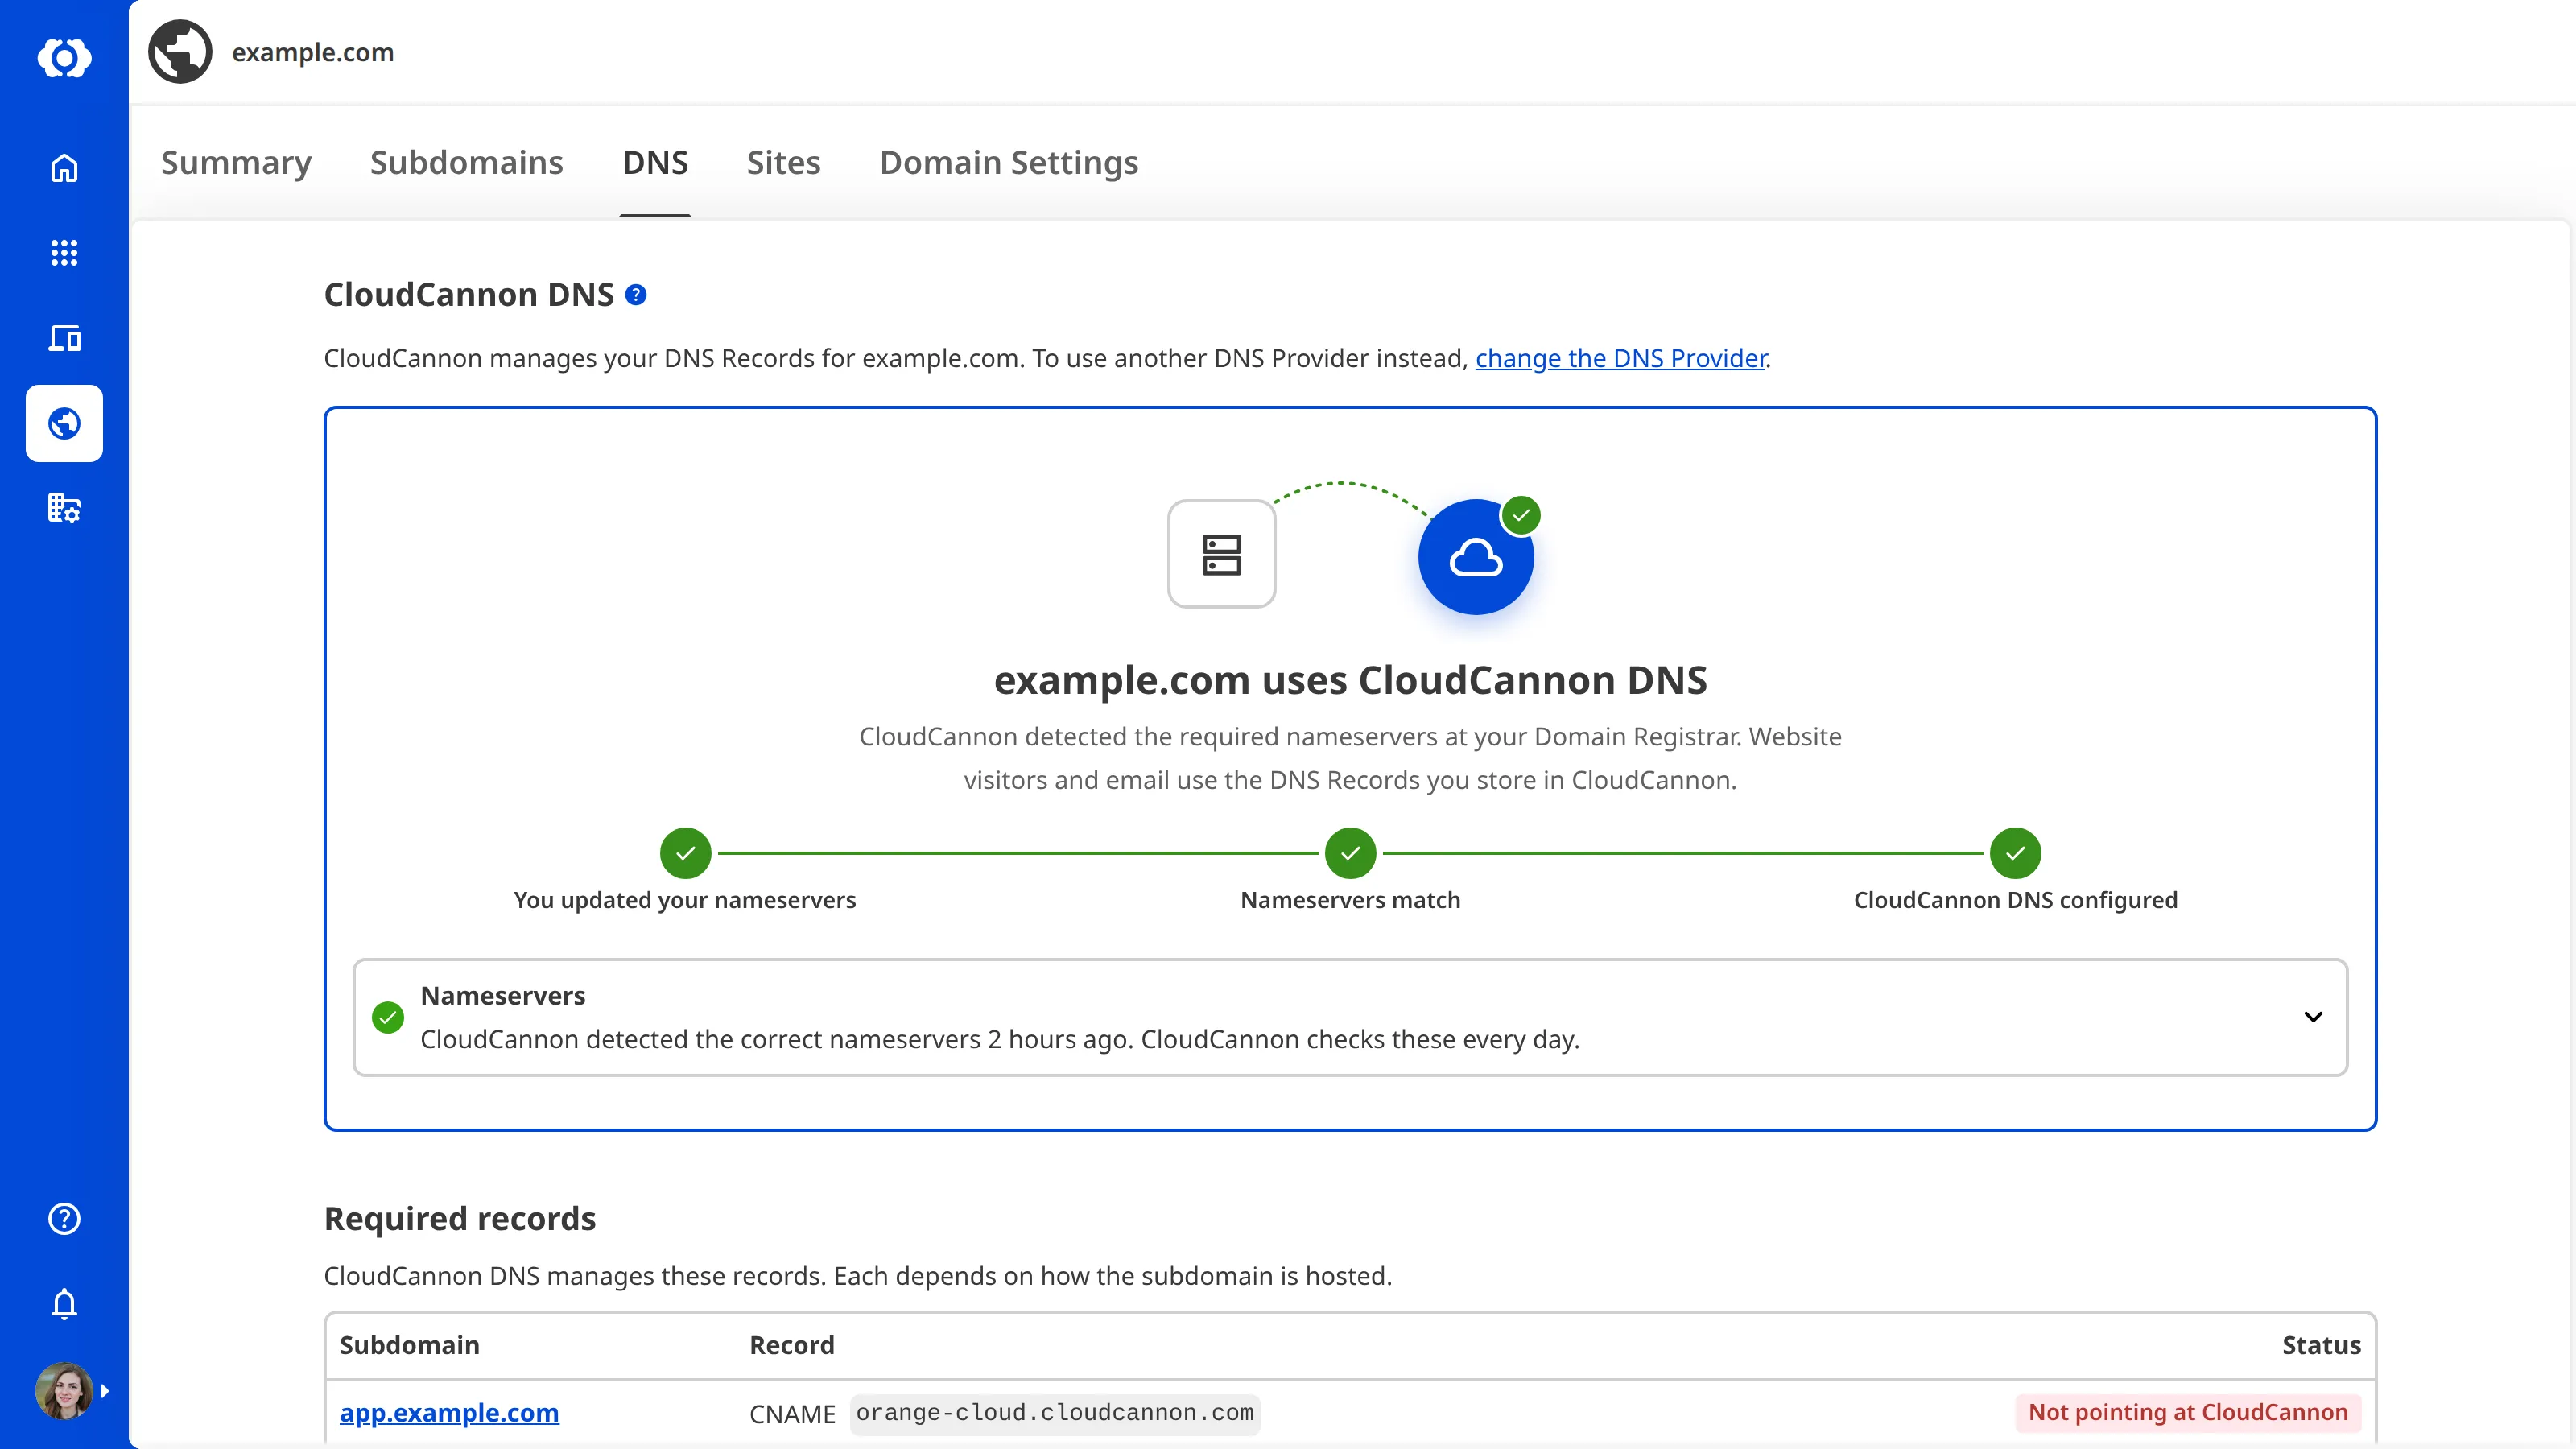
If a record in CloudCannon DNS stops a Subdomain from reaching CloudCannon, CloudCannon can replace or remove that record for you. For example, a record for the Subdomain can override the wildcard record for your Base Domain. The Fix button appears once your nameservers point at CloudCannon DNS.
To fix the DNS Record for a Subdomain:
- Navigate to the DNS tab of the Domain page, or to the DNS section of the Subdomain page.
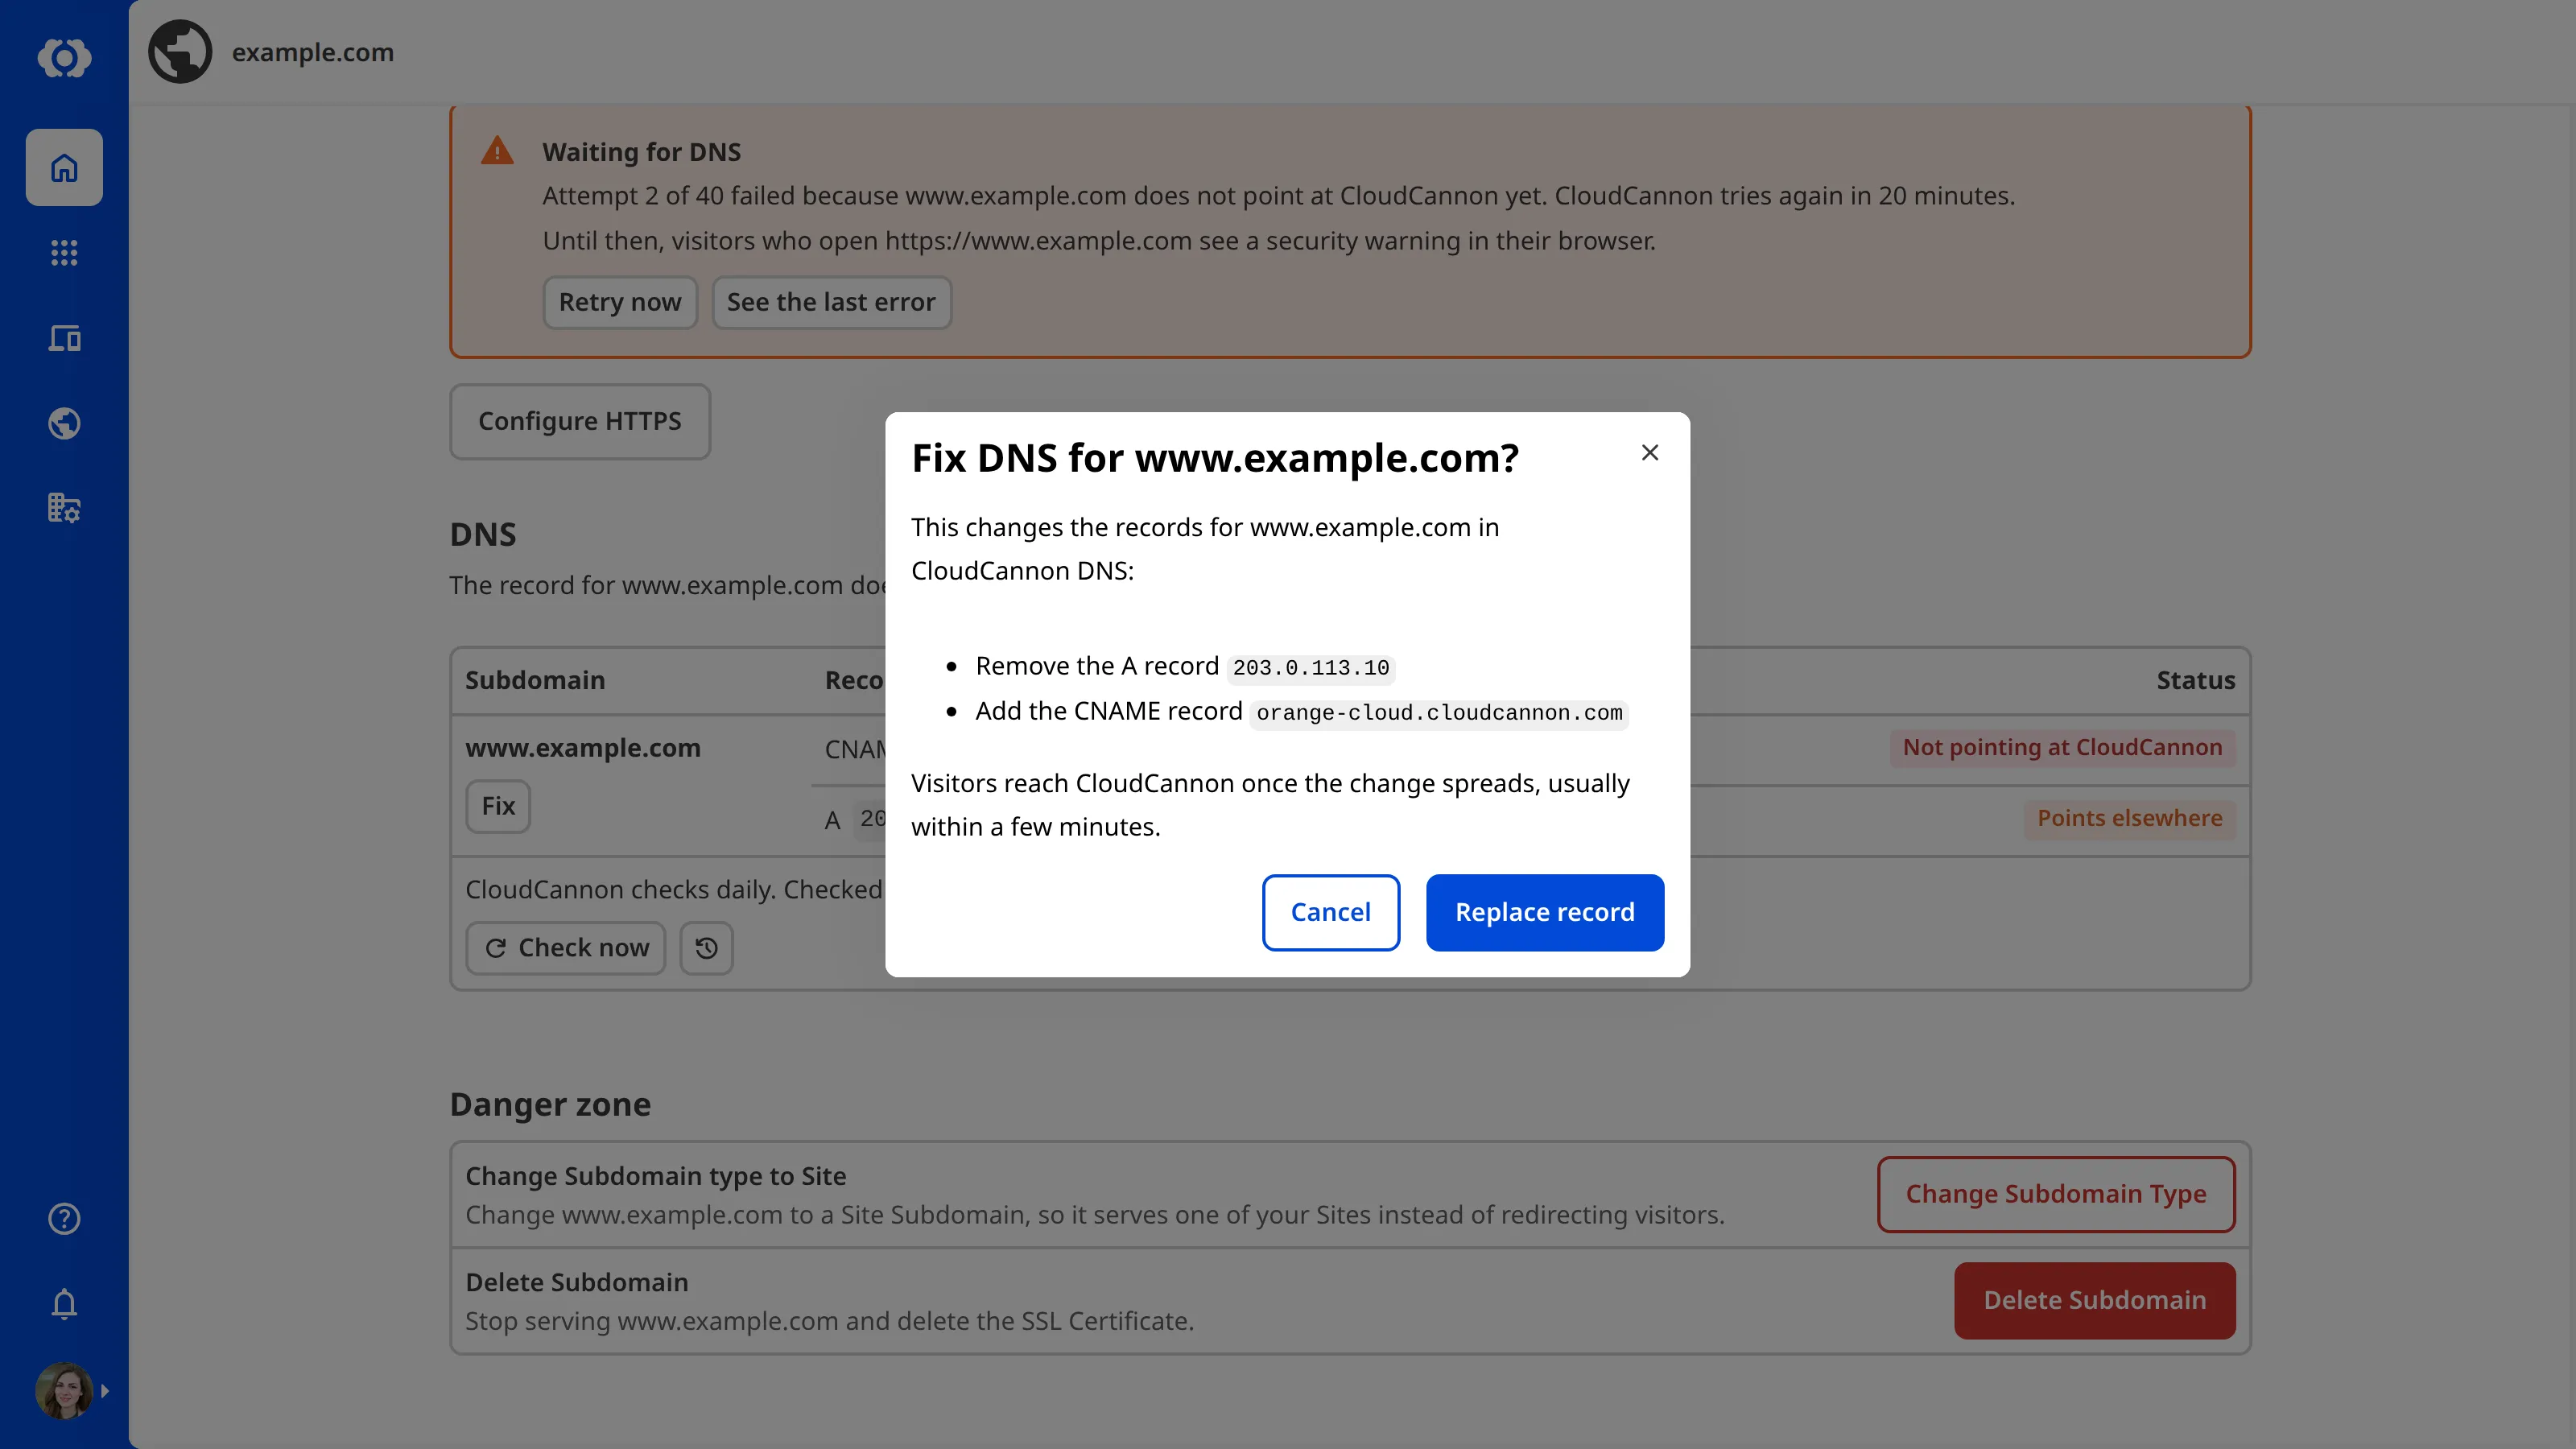
- Click the Fix button in the row for the Subdomain. CloudCannon will open the Fix DNS for [Subdomain]? modal, which lists the records it will remove and add.
- Click the Replace record, Remove record, or Add record button to confirm the change. When the change covers more than one record, the button reads Replace records, Remove records, or Add records.
CloudCannon will update the records in CloudCannon DNS. Visitors reach CloudCannon once the change spreads, usually within a few minutes.
CloudCannon checks the record of each Subdomain daily. Click the Check now button below the Required records table, or in the DNS section of a Subdomain page, to check again. For a minute after a check, the button is disabled. Checking a Subdomain's record requires the base-domain:settings:details:write permission. Without it, the button is disabled, and hovering over it shows You do not have permission to edit the Domain Settings for [Base Domain].