A Custom Domain A domain you own and connect to your CloudCannon Organization, so visitors reach your Site at your own address instead of its Testing Domain. You buy the domain from a domain registrar, connect it to your Organization, then add it to your Sites. A workspace in CloudCannon that groups together Sites, Organization Members, and shared resources. It is also the unit CloudCannon bills for. You can define permissions for your Organization, controlling the access each Organization Member has to resources on CloudCannon. You can create and be a part of multiple Organizations. A website in CloudCannon that includes all the files, content, configuration, and settings needed to edit, build, and host a complete website.Custom Domain
Organization
Site
You can host a CloudCannon Site on the Base Domain The primary domain name for a website, without any subdomains. For example, in "www.example.com", the Base Domain is "example.com". In CloudCannon, you connect your Base Domain to your Organization as a Custom Domain. An additional name on the front of your URL, prefixing your Base Domain name (e.g., "docs" in docs.example.com or "blog" in blog.example.com). In CloudCannon, every address on your Custom Domain, including the Base Domain itself, is a Subdomain with its own hosting, HTTPS, and DNS settings. Each Subdomain serves Sites, each at its own path, or redirects visitors to another domain. A Subdomain with no Site yet shows its visitors a 404 page until you add a Site.Base Domain
example.com), another SubdomainSubdomain
docs.example.com), or a path on either (e.g., example.com/staff/). Several Sites can share a Subdomain, each at its own path. Every Site on a Subdomain shares that Subdomain's hosting, HTTPS, and DNS settings. A Site at a path needs to build into a folder that matches the path. For more information, please read the section on building your Site for a path.
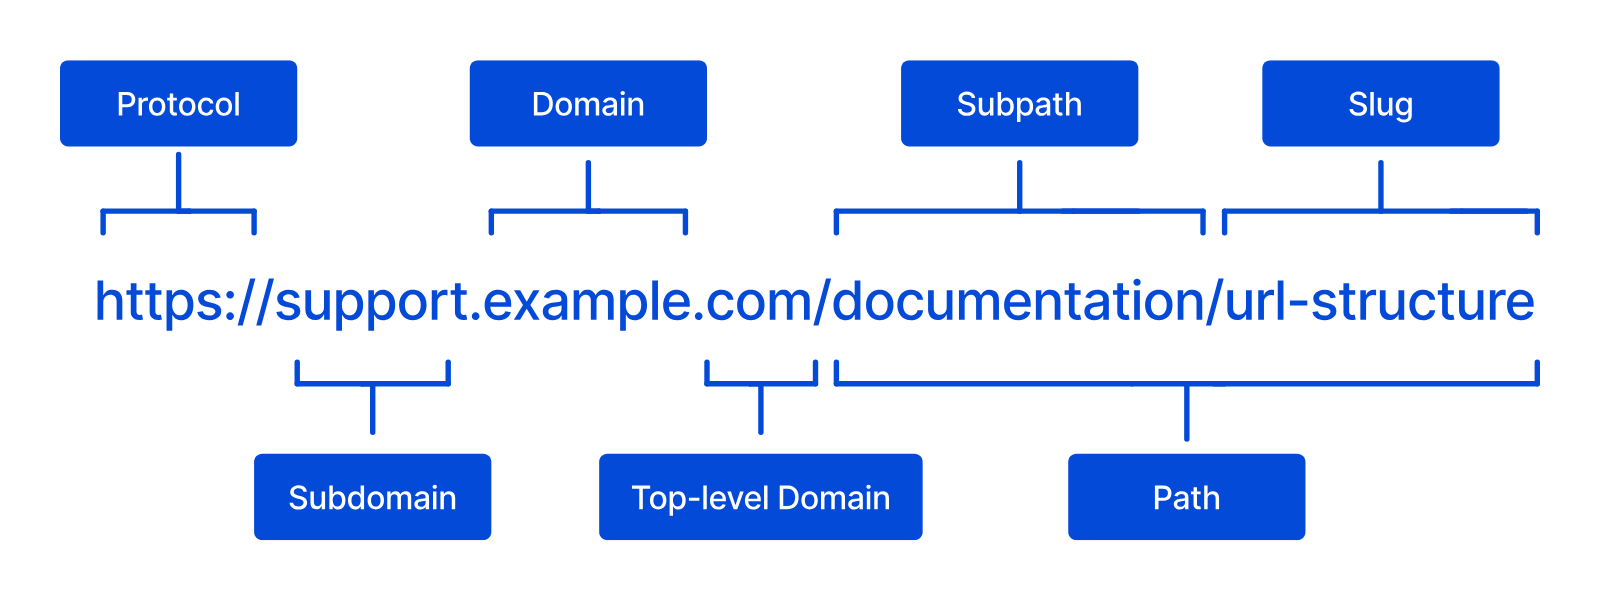
When you add the Base Domain (e.g., example.com) as a new Subdomain, CloudCannon also adds www.example.com as a redirect to it, if www.example.com does not already exist. When you add www.example.com as a new Subdomain, CloudCannon adds example.com as a redirect to www.example.com in the same way.
Before we begin, this article assumes you have connected a Custom Domain to your Organization, and that your Site is in Hosted Mode. CloudCannon hides the Custom Domain page for a Site in Headless Mode. For more information, please read our documentation on what Site Building Mode is.
Add a Custom Domain from Site Settings#
To add a Custom Domain to your Site:
- Log in to CloudCannon.
- Select the Organization with the Site you want to add a Custom Domain to.
- Click the Sites link in the App Sidebar. CloudCannon will open the Sites BrowserGlossary term
App Sidebar
The left-most UI panel in the CloudCannon app. This panel contains links to your Organization Home, Sites, Projects, Domains, and Org Settings pages, as well as app Updates and your Avatar.
.Glossary termSites Browser
CloudCannon's interface for managing and organizing all the Sites within an Organization. The Sites Browser allows you to browse, search, and open Sites, displaying key information like name, icon, branch, Build status, and domain. You can access the Sites Browser from the App Sidebar.
- Click the Cardfor the Site you want to add a Custom Domain to. CloudCannon will open the Dashboard for that Site.Glossary term
Card
The repeated block CloudCannon uses to represent one item in a list, browser, or input, typically showing a preview image, title, subtitle, icon, and key metadata. Cards represent files and folders in the Collection Browser and File Browser, as well as Sites, Organizations, Organization Members, domains, Health Checks, and items inside Array and Object Inputs. You can configure how Cards look for your files, making it easier to browse and identify content at a glance.
- Navigate to the Custom Domain page under Site Settings. CloudCannon will open the Custom Domain page.
- Select the Custom Domain you want to add using the Base Domain dropdown.
- (Optional.) Enter a Subdomain in the Subdomain text field. Leave this field empty to host your Site on the Base Domain itself.
- (Optional.) Enter a path in the Subpath text field (e.g.,
/jobs/), using lowercase letters, numbers,_, and-. Leave this field empty to host your Site at the root of the Subdomain. - Click the Add custom domain button.
CloudCannon will add your Site to the Subdomain. Visitors reach your Site on your Custom Domain once the DNS for the Subdomain points at CloudCannon. Until then, your Site stays on its Testing Domain, and the Custom Domain page shows a setup guide:
- CloudCannon DNS — If the nameservers of your domain don't point at CloudCannon DNSyet, the guide shows the nameservers to set at your domain registrarGlossary term
CloudCannon DNS
A DNS Provider option where CloudCannon manages the DNS records of your Custom Domain. CloudCannon adds the records each Subdomain needs, and the TXT records for your SSL Certificates, for you. To use it, you replace the nameservers at your domain registrar with CloudCannon's nameservers.
. Without theGlossary termDomain Registrar
A third-party company that manages the registration and renewal of domain names. Domain registrars allow you to purchase and configure domain names, and they handle the administrative aspects of domain ownership. You must purchase a domain name from a domain registrar before you can connect it to your CloudCannon Organization as a Custom Domain.
base-domain:settings:dns:readpermission, the guide asks you to finish setting up DNS but doesn't list the nameservers. For more information, please read our documentation on configuring CloudCannon DNS. - External DNS — On external DNS, the guide shows how far along setup is, and its Scroll to DNS Records button scrolls to the DNS section, which lists the record the Subdomain needs at your DNS Provider, with a Copy icon next to each value and the I've updated it button. For more information, please read our documentation on configuring external DNS.Glossary term
External DNS
Domain Name System configuration managed by a third-party DNS Provider rather than CloudCannon DNS. External DNS allows you to host your Site on CloudCannon but manage your DNS records elsewhere, such as with Cloudflare or on your own servers. You add the DNS records CloudCannon lists for each Subdomain at your DNS Provider.
If the Subdomain you enter already exists, CloudCannon adds your Site to it:
- The Subdomain already serves Sites — Your Site joins it and uses its hosting, HTTPS, and DNS settings. The path you choose must not already be in use on the Subdomain.
- The Subdomain is a redirect — Adding your Site stops the redirect and serves your Site on the Subdomain instead. Before you add it, the Custom Domain page warns you (e.g., www.example.com redirects to example.com now. Adding Marketing site stops the redirect and serves Marketing site there.).
The Base Domain dropdown disables any domain whose settings you can't edit and labels it No permission. If you have the base-domain:create permission, you can also connect a new domain from the dropdown. For more information, please read our documentation on connecting a Custom Domain to your Organization.


If the Subdomain has no other Sites and takes your Organization over the number of Subdomains serving Sites that its Subscription Plan A set of features available to your Organization, the monthly usage limits for resources, and the price you pay for access to those features and resources, monthly or annually. Each Organization in CloudCannon can have one Subscription Plan, and can update or cancel at any time.Subscription Plan
In a Client Organization A separate Organization that a Partner Organization manages but that the client uses and pays for. Client Organizations are part of the CloudCannon Partner Program and give each client their own team, billing, and login. Unlike Guest Access, which shares a single Site with someone who doesn't have a CloudCannon account, a Client Organization is a full, independent Organization. A trial period that gives a new Organization access to Standard Plan features without requiring a payment method.Client Organization
Free Trial
You can also add a Site to a Subdomain from the Subdomain page, which you can open from the Subdomains tab of your Domain page. For more information, please read our documentation on managing the Sites on a Subdomain.
Build your Site for a path#
If you host your Site at a path (e.g., example.com/docs/), your build output needs a folder that matches the path. CloudCannon doesn't remove the path from a request before it looks for the file, so it serves example.com/docs/about/ from docs/about/index.html in your build output. Your Site's links also need to include the path, so that a link to /about/ becomes /docs/about/.
Many SSGs have a setting that adds a path to your links, but not all of them also build your files into a matching folder. After you add a path, check that your build output has a folder with that name and that every page of your Site is inside it.
If your Jekyll Site sets baseurl in its _config.yml file, CloudCannon serves the build output under that baseurl instead. Set baseurl to the same path (e.g., /docs) rather than moving your files.
Use Reseed to build for a path
Reseed is an open-source tool that copies your build output into a folder named after the path and rewrites the links in your pages to include it. You can run Reseed after your build in a postbuild script:
#!/bin/bash

npx reseed -s _site -d _reseed -b docs
rm -rf _site
mv _reseed _siteReplace _site with the Output Path of your Site, and docs with your path. CloudCannon uploads the files in your Output Path once the postbuild script finishes, so the script must leave the rewritten files there. For more information, please read our documentation on extending your build process with hooks and configuring your command line options.
CloudCannon can also run Reseed as a build step for you.
To run Reseed as a build step:
- Contact our support team with the name of your Site and the path.
- Enter the path in the Baseurl field on the Reseed page under Site Settings.
- Click the Update Reseed Details button.
CloudCannon will rebuild your Site with the new path.
Review your Site's Custom Domain#
Once your Site has a Custom Domain, the Custom Domain page under Site Settings shows the address of your Site on the Subdomain, the same way the Testing Domain page shows its Testing Domain. The line above the address says which state it is in:
- [Site Name] goes live at this address once [Subdomain] points at CloudCannon - The DNS record for the Subdomain doesn't point at CloudCannon yet.
- [Site Name] is live at - Visitors reach your Site at this address over HTTPS.
- [Site Name] is live at this address, and CloudCannon is turning HTTPS on - Visitors reach your Site, and its SSL Certificate is on its way.
- [Site Name] is live at this address, but HTTPS is not working, so visitors see a security warning - The HTTPS section under Subdomain settings says why.
Until the Subdomain is live, the setup guide appears below the address. The Danger zone section above the Subdomain settings heading has the Remove custom domain button, which stops hosting your Site on the Subdomain. For more information, please read our documentation on removing a Custom Domain from your Site.
Below the Subdomain settings heading, a line links to the page for the Subdomain on your Domain page, and the page for the Subdomain follows, without its heading. It has the same Sites, Hosting, HTTPS, DNS, and Danger zone sections as the Subdomain page you open from the Subdomains tab of your Domain page, because these settings belong to the Subdomain and apply to every Site on it. The Sites section lists every Site the Subdomain serves, with the path at which each Site is served, and labels your Site with This site.
From the Subdomain settings, you can:
- Click the Add a Site button in the Sites section to serve another Site on the Subdomain.
- Click the Context Menufor a Site in the Sites section and select the Open Site, Swap for another Site, Change Subpath, or Remove from [Subdomain] option. For more information, please read our documentation on managing the Sites on a Subdomain.Glossary term
Context Menu
A menu that appears when you click the six-dot icon in the top right of a File Card or three-dot icon in the top right of an Editing Interface. This menu provides quick access to file actions and options such as previewing a file live on your website, cloning or renaming a file, and more.
- Click the Configure hosting button in the Hosting section or the Configure HTTPS button in the HTTPS section, or check the DNS in the DNS section. For more information, please read our documentation on configuring a Subdomain's hosting, HTTPS, and DNS.
- Click the Change Subdomain Type button next to Change Subdomain type to Redirect in the Danger zone section to change the Subdomain into a redirect to another domain. For more information, please read our documentation on managing your Redirect Subdomains.
- Click the Delete Subdomain button in the Danger zone section to delete the Subdomain. For more information, please read our documentation on deleting a Subdomain.

If a change in the Subdomain settings takes your Site off the Subdomain, such as removing or swapping your Site, changing the Subdomain to a redirect, or deleting the Subdomain, CloudCannon opens the [Site Name] is no longer on [Subdomain] modal. The modal explains what happened and that your Site keeps its Testing Domain. Click the Stay here button to stay on the Custom Domain page, or the Go to [Subdomain] settings button to open the page for the Subdomain. If you deleted the Subdomain, the second button is Go to subdomains, and it opens the Subdomains tab instead.
If you can view the Custom Domain but don't have the base-domain:settings:details:write permission for its Base Domain, a sentence that explains which permission you need replaces the Subdomain settings. If you don't have the base-domain:details:read permission for the Custom Domain, the Custom Domain page shows only your Site's address, with a Subpath for [Site Name] field, an Update Subpath button, and the Remove custom domain button. All three are disabled, and hovering over each one shows a tooltip that names the permission you need. To change the path or remove the Custom Domain, ask a member of your Organization who can edit the settings of the Base Domain (the base-domain:settings:details:write permission), such as a member of the Owners, Developers, or Partner Default Permission Groups, to make the change.
You should also check the SSL Certificate for your Site's Subdomain. For more information, please read our documentation on adding an auto-generated SSL Certificate or adding a Custom SSL Certificate.