Subscription Plan required
Connecting a DAM is available on our Standard, Team, or Enterprise Plan. Linking more than one DAM to a Site is available on our Enterprise Plan.
Bynder is one of several DAM An abbreviation of Digital Asset Management, a DAM is a system for organizing, storing, and retrieving digital assets like images, videos, and documents. A person who belongs to the same Organization as you. Organization Members are other CloudCannon users who have been invited to your Organization to collaborate on Sites, edit content, or manage settings. Each Organization Member has their own CloudCannon account with individual permissions assigned through Permission Groups, and uses one Seat in your Subscription Plan. Organization Members were previously called Team Members. A website in CloudCannon that includes all the files, content, configuration, and settings needed to edit, build, and host a complete website.DAM
Organization Member
Site
To connect a Bynder DAM, you create an OAuth An abbreviation of Open Authorization, OAuth is a standard for access delegation that allows users to grant websites or applications access to their information on other websites without sharing passwords. CloudCannon uses OAuth for authenticating with Git providers and other external services. A workspace in CloudCannon that groups together Sites, Organization Members, and shared resources. It is also the unit CloudCannon bills for. You can define permissions for your Organization, controlling the access each Organization Member has to resources on CloudCannon. You can create and be a part of multiple Organizations.OAuth
Organization
This article covers connecting a new Bynder DAM. To change the details of a DAM you have already connected, please read our documentation on managing your connected DAMs.
Choose a style of asset browser#
Choose how Organization Members will browse your Bynder assets in CloudCannon. You select this option when you authenticate Bynder in CloudCannon.
- CloudCannon asset browser — Organization Members browse and upload Bynder assets in the same file browser CloudCannon uses for other DAMs, and can search assets by keyword. New Bynder DAMs use this option by default. Choose this option if you want Bynder assets to work the same way as assets from your other DAMs.
- Bynder widget — Organization Members browse your assets in Bynder's Universal Compact View, which has Bynder's search. Organization Members must use the Upload a new file or Upload a new image option on an input to upload files, because the Bynder widget does not include an option to upload directly from the asset browser. Choose this option if your team already works in Bynder and wants to search assets the way they do there.
With either option, CloudCannon connects to Bynder using the OAuth application you create below, so Organization Members do not need their own Bynder accounts. You can change the style of asset browser at any time, and after you authenticate the DAM.
Create an OAuth application in Bynder#
To create an OAuth application, your Bynder account needs the Manage portal settings and Manage OAuth apps permissions in Bynder. Bynder recommends creating a dedicated Bynder user to assign to integrations like CloudCannon. The application also needs a CORS An abbreviation of Cross-Origin Resource Sharing, CORS is a security mechanism that allows web pages to access resources from different domains. CORS settings are important when configuring external integrations and APIs in CloudCannon. CORS configuration may be needed when creating a Cloudflare R2 DAM or other external asset storage.CORS
Bynder does not let you change an application's scopes after you create it, so to change the scopes later, you will need to create a new application. For more information on managing OAuth applications, please read Bynder's guide to creating and managing OAuth apps.
To create an OAuth application for CloudCannon:
- In your Bynder portal, open Settings, then Advanced Settings, then Portal settings.
- Click the OAuth Apps link in the sidebar.
- Click the Register new application button. Bynder will open the form for a new OAuth application.
- Enter a name, such as "CloudCannon", in the Application name field.
- Enter the remaining details in the Homepage URL and Application description fields.
- Select CloudCannon from the Integration dropdown. If CloudCannon is not listed, select Other and enter "CloudCannon" as the integration name.
- Select Client Credentials from the Select grant type dropdown. Bynder will show the Assigned user field.
- Search for and select a Bynder user in the Assigned user field. Choose a user who can access the assets and brands you want available in CloudCannon.
- Enter
https://app.cloudcannon.comin the Set HTTP access control (CORS) field and press Enter. - Select the
asset:readandasset:writecheckboxes under Select scopes. - Click the Register application button.
Bynder will show the Client ID and Client Secret for your new application. Copy both, along with your Bynder portal URL (for example, https://your-company.bynder.com). You need all three to authenticate Bynder in CloudCannon. Bynder only shows the Client Secret once, after you register the application. If you lose it, you can regenerate it in Bynder, but the old secret stops working, so you will also need to update it in CloudCannon.
CloudCannon uses the assigned user's access for every request it makes to Bynder. If Organization Members cannot see an asset in CloudCannon, check that the assigned user can access it in Bynder.
Find your Brand ID (optional)
By default, CloudCannon uploads new assets to your Bynder account's primary brand. To upload to a specific brand or sub-brand instead, you need its Brand ID. You can look up Brand IDs through the Bynder API.
First, request an access token with your Client ID and Client Secret. Replace the portal URL and credentials with your own:
curl -X POST https://your-company.bynder.com/v6/authentication/oauth2/token \
  -d grant_type=client_credentials \
  -d client_id=YOUR_CLIENT_ID \
  -d client_secret=YOUR_CLIENT_SECRET \
-d scope="asset:read asset:write"The response contains an access_token. Use it to request the list of brands in your portal:
curl https://your-company.bynder.com/api/v4/brands/ \
-H "Authorization: Bearer YOUR_ACCESS_TOKEN"The response lists each brand with an id and a name. Each brand's sub-brands are listed under its subBrands key, each with its own id and name. Copy the id of the brand or sub-brand you want CloudCannon to upload to. You will enter it in the Default Brand ID field when you authenticate Bynder.
Authenticate Bynder in CloudCannon#
Before you start, make sure you have the Client ID, Client Secret, and portal URL from your Bynder OAuth application.
To authenticate Bynder as a DAM on your Organization:
- Navigate to the Assets page under Org Settings.Glossary term
Org Settings
The settings page for a CloudCannon Organization, where organization administrators can manage organization-wide settings, including billing, team permissions, integrations, branding, and security policies. You can access this page using the Organization Settings link in the App Sidebar.
- Click the Authenticate a new DAM button. CloudCannon will open the Authenticate new DAM page.
- Select Bynder from the DAM provider dropdown. CloudCannon will show the fields for a Bynder DAM.
- Enter a name to identify the DAM in the Name field.
- Enter your Bynder portal URL in the Portal URL field.
- Enter your Client ID in the Client ID field.
- Enter your Client Secret in the Client Secret field.
- Expand the Advanced options section. CloudCannon will show the Asset browser options and the optional fields.
- Select the Use CloudCannon asset browser or Use Bynder widget radio button, to match the asset browser you chose.
- Click the Authenticate button.
CloudCannon will check your credentials with Bynder, add the DAM to your Organization, and open the page for your new DAM.
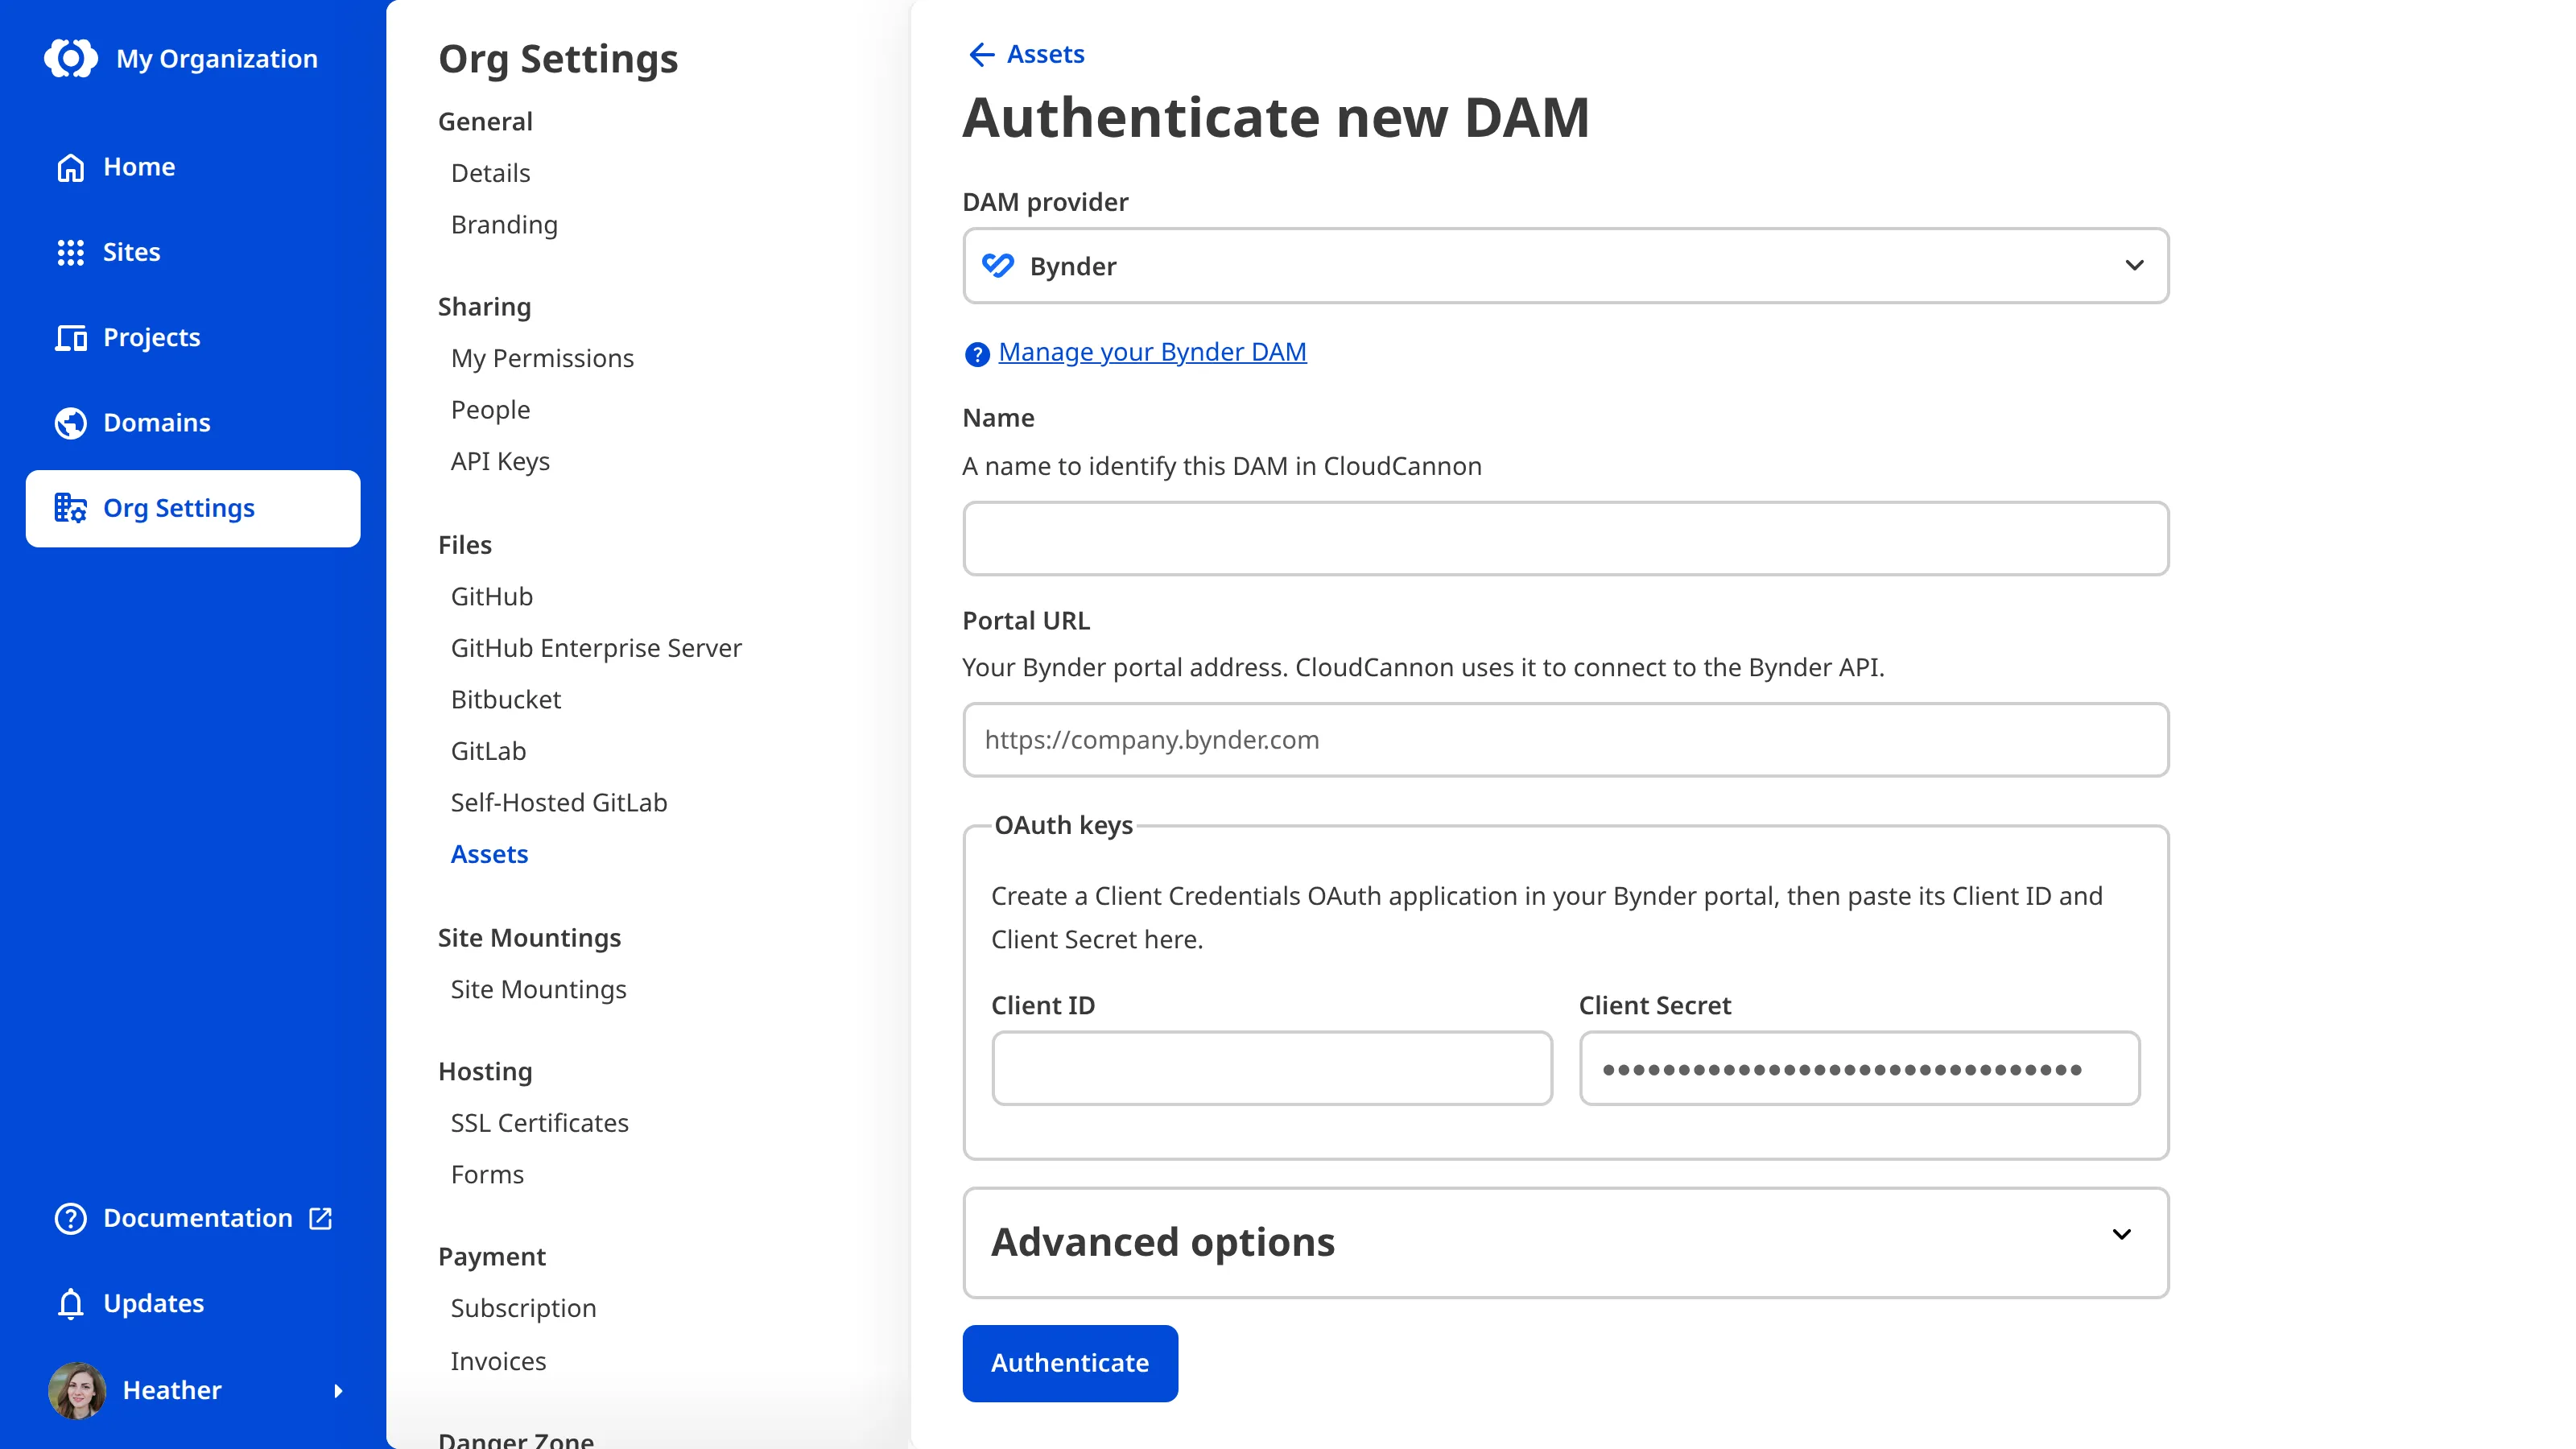
The Advanced options section also contains these optional fields:
- Default Brand ID — The Brand ID CloudCannon uploads new assets to. Leave it blank to upload to your Bynder account's primary brand.
- Custom Delivery Hostname — A base URL CloudCannon adds to the start of asset paths when it builds public URLs. Leave it blank to use your portal URL.
- Maximum size for uploaded files (bytes) — The largest file, in bytes, that Organization Members can upload to this DAM.
You can also authenticate Bynder from a Site. On the Assets page under Site Settings, select the New DAM option from the Select your DAM dropdown. CloudCannon will open the New DAM modal, which has the same fields as the Authenticate new DAM page. To authenticate from a Site, your Permission Group A group that defines what permissions Organization Members have in CloudCannon. Permission Groups allow you to make Resources available to your Organization Members and define what actions are allowed (Read, Write, or Create) for each resource. CloudCannon provides several Default Permission Groups (including Owners, Developers, Technical Editors, Editors, and Billing) and you can create Custom Permission Groups for more granular control.Permission Group
site:settings:dam:write permission.
Link your Bynder DAM to a Site#
Each Site can link one DAM, or up to 100 DAMs on the Enterprise Plan CloudCannon's premium plan designed for large Organizations, including enhanced security features, priority support, custom integrations, and enterprise-level user management capabilities.Enterprise Plan
To link your Bynder DAM to a Site:
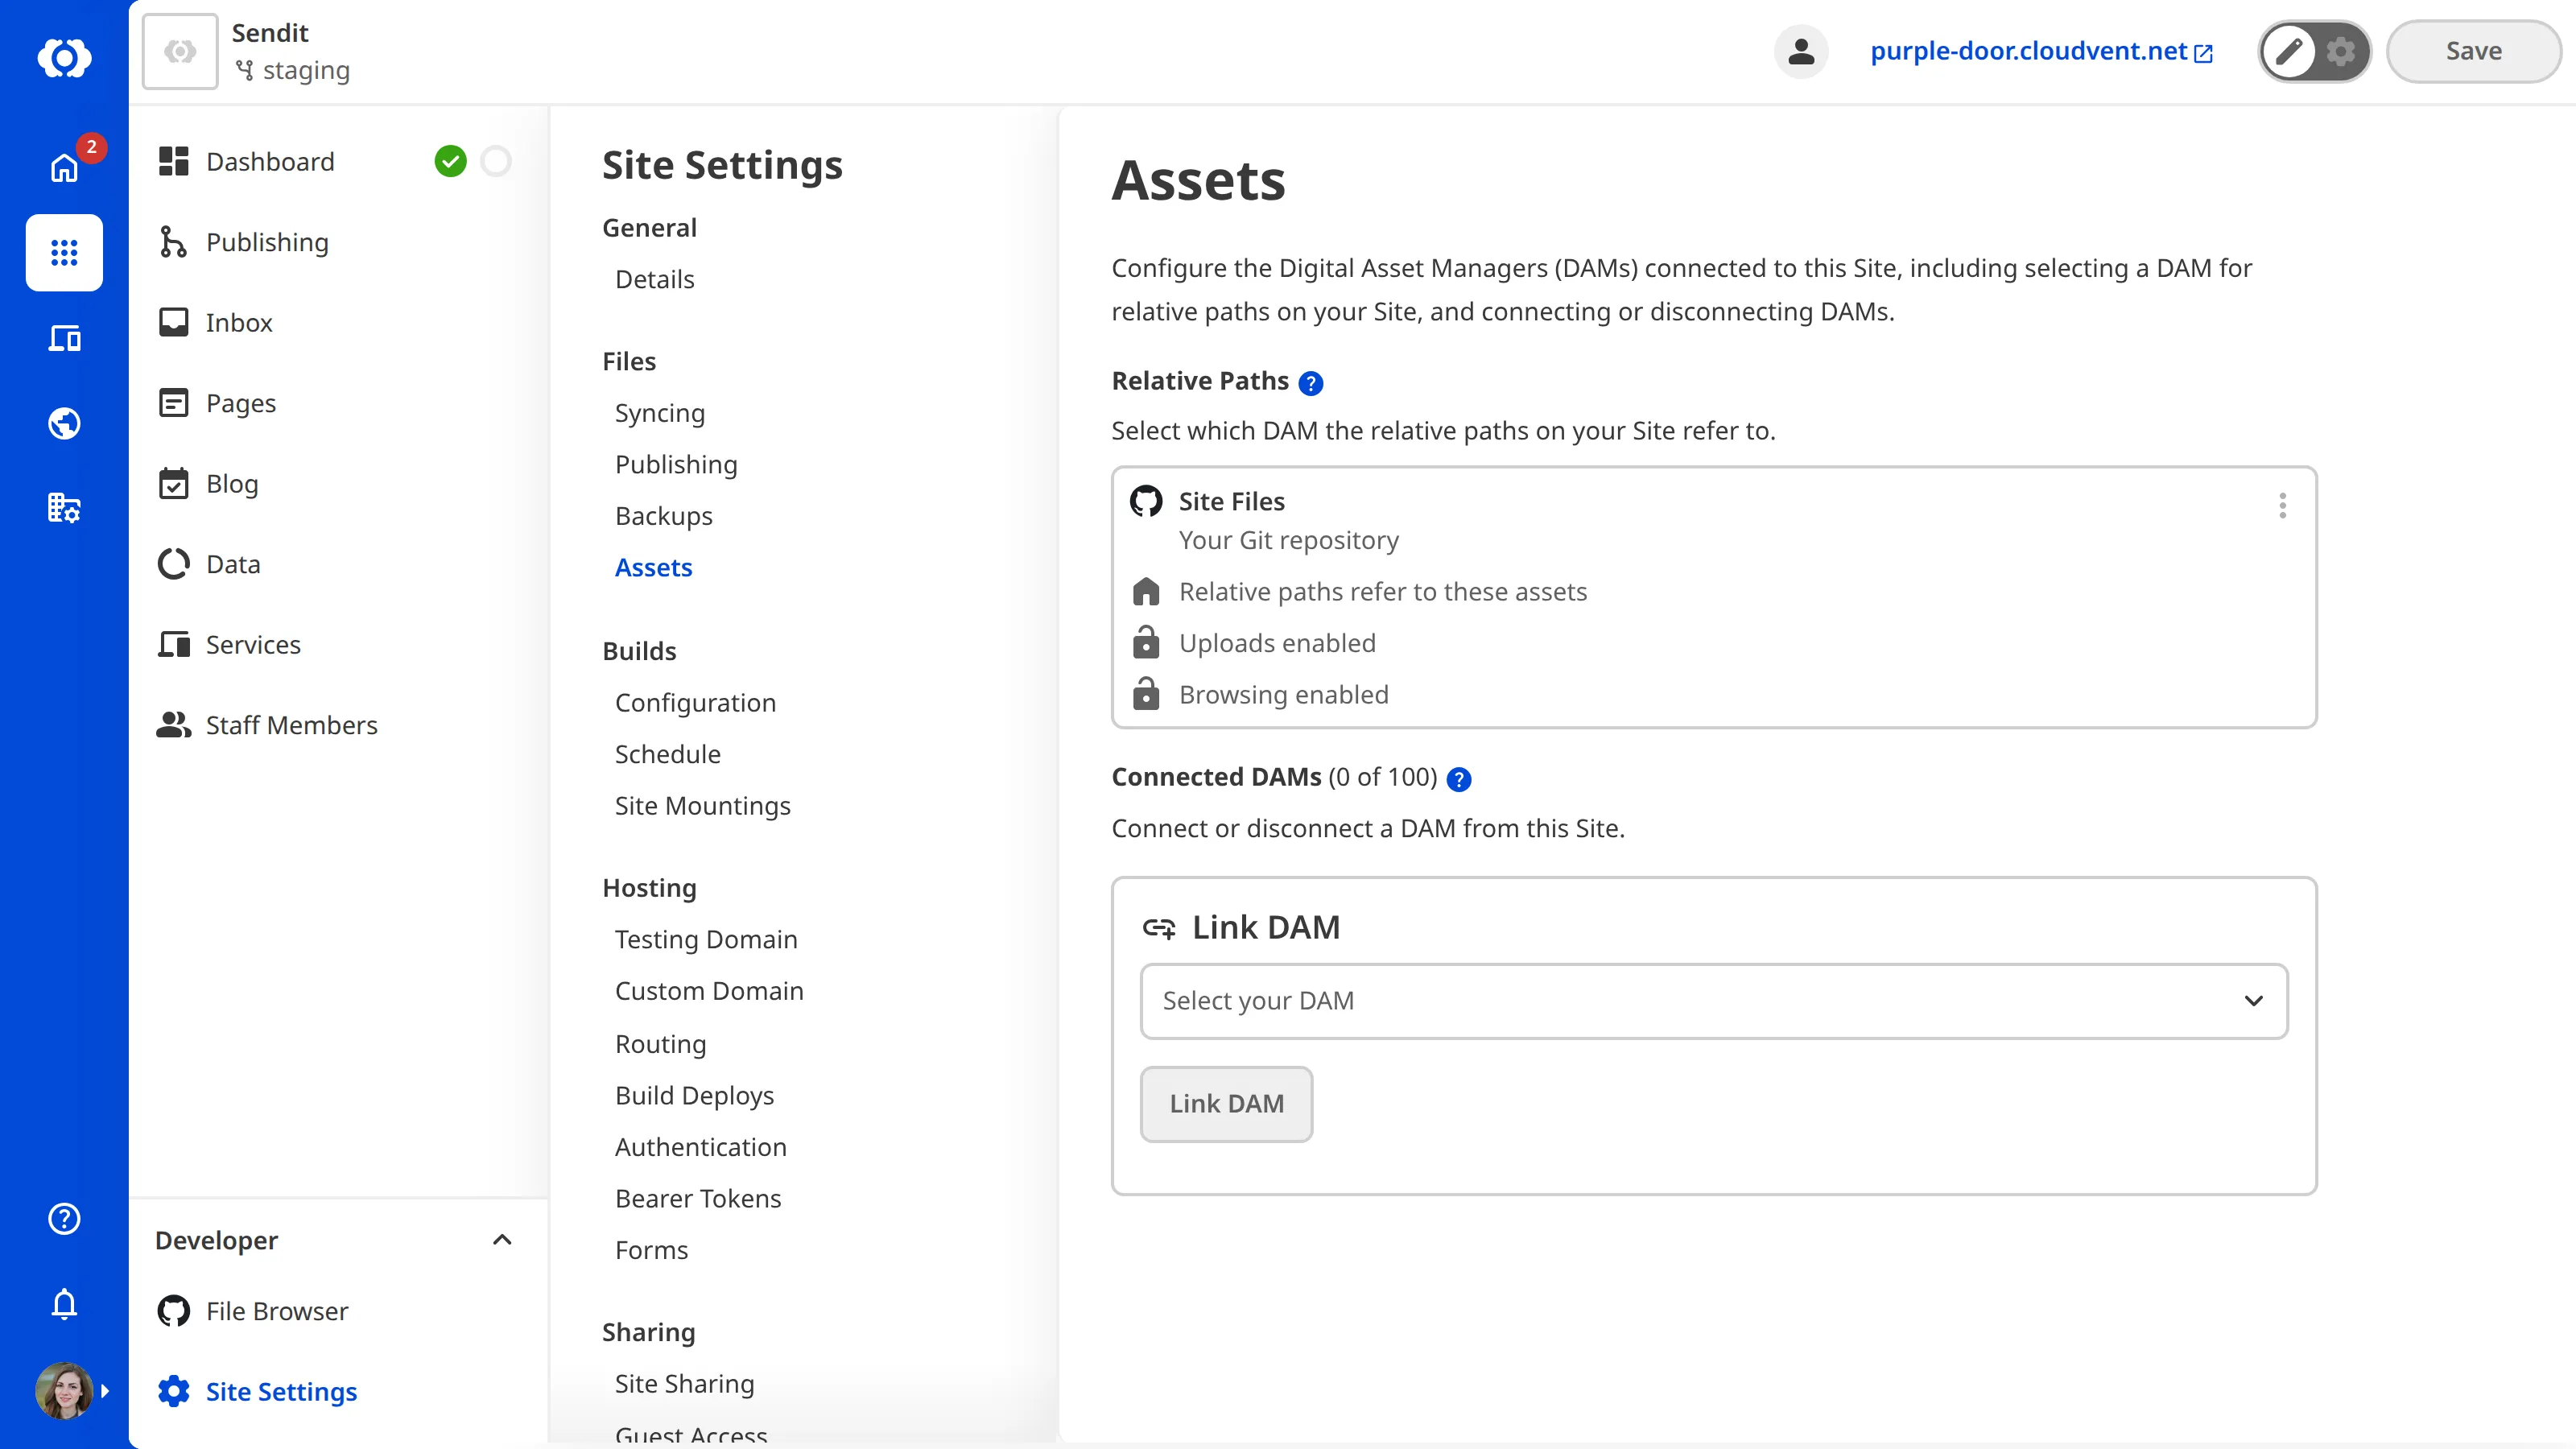
- Navigate to the Assets page under Site Settings for the Site.
- Select your Bynder DAM from the Select your DAM dropdown under Link DAM. CloudCannon will show the options for using the DAM on this Site.
- Click the Link DAM button.
CloudCannon will add the DAM to the Connected DAMs list for the Site. Organization Members can now browse and upload Bynder assets on this Site.
Configure your Bynder DAM for a Site#
A Bynder DAM has two options for each Site it is linked to. You can set them when you link the DAM, or change them later.
- Uploads Locked — Prevents Organization Members from uploading to the DAM from this Site. They can still browse and select existing assets.
- Reference Key — A key you can use in the
allowed_sourcesoption to choose which inputs offer this DAM. For more information, please read our documentation on managing your connected DAMs.
To change the options for a linked Bynder DAM:
- Navigate to the Assets page under Site Settings for the Site.
- Click the three-dot icon on the Cardfor your Bynder DAM. CloudCannon will open the Context MenuGlossary term
Card
The repeated block CloudCannon uses to represent one item in a list, browser, or input, typically showing a preview image, title, subtitle, icon, and key metadata. Cards represent files and folders in the Collection Browser and File Browser, as well as Sites, Organizations, Organization Members, domains, health checks, and items inside Array and Object Inputs. You can configure how Cards look for your files, making it easier to browse and identify content at a glance.
.Glossary termContext Menu
A menu that appears when you click the six-dot icon in the top right of a File Card or three-dot icon in the top right of an Editing Interface. This menu provides quick access to file actions and options such as previewing a file live on your website, cloning or renaming a file, and more.
- Select Settings from the Context Menu. CloudCannon will open the Update site DAM modal.
- Change the Uploads Locked checkbox or the Reference Key field.
- Click the Update button.
CloudCannon will save the options for this Site.
How uploads to your Bynder DAM work#
Bynder stores assets differently from file-based DAMs:
- Bynder DAMs have no folders, so the Extra prefix option is not available for them in Site Settings.
- CloudCannon refers to each Bynder asset by its Bynder asset ID rather than by a filename.
When Organization Members upload a file to a Bynder DAM, CloudCannon:
- Saves it as a new Bynder asset, named after the uploaded file, in the brand set by Default Brand ID.
- Creates a new asset each time, without checking for an existing asset with the same name.
- Waits for Bynder to process the upload. If Bynder has not finished after about 60 seconds, the upload fails.
- Finishes the upload even if you leave the page while Bynder is processing it.
Choose a version of a Bynder asset#
Bynder keeps several versions of each asset, such as the full-size original and smaller resized versions. CloudCannon opens the Choose a version picker so you can choose which version to use:
- After you upload a file to a Bynder DAM from a File Input, a Rich Text Input, or the Visual EditorGlossary term
File Input
An editing interface for file paths structured data values, which appears in the Data Editor and the sidebar or data panels in the Content Editor and Visual Editor. There are three types of File Input: File, Document, and Image.
.Glossary termVisual Editor
CloudCannon's visual editing interface provides a user-friendly way of updating your website files on an interactive preview of your webpage. You can navigate around your website preview using links/buttons, as you would on the live version, and edit your content inline on the page, or with the data panel or sidebar. What you see in the Visual Editor is what your website visitors will see on your live webpages.
- When you select an existing Bynder asset in a File Input. If the asset has only one version, CloudCannon uses that version without opening the picker.
The picker opens whether the DAM uses the CloudCannon asset browser or the Bynder widget. If you close the picker without choosing a version, CloudCannon does not add the asset to your content.
Troubleshoot your Bynder DAM connection#
If CloudCannon cannot connect to Bynder, it shows an error message. Which messages you can see depends on whether you are authenticating the DAM or browsing and uploading assets.
Errors when you authenticate Bynder
When you click the Authenticate button on the Authenticate new DAM page, CloudCannon connects to Bynder with your Client ID and Client Secret. If Bynder rejects the connection, the error appears on the page and starts with bynder:.
- Invalid credentials — Bynder rejected the Client ID or Client Secret. Copy both again from your Bynder OAuth application, and check that the application uses the Client Credentials grant type.
- Forbidden — Bynder refused the request. Check that your OAuth application has the
asset:readandasset:writescopes, and that the assigned user can access your assets and brands. If the error continues, contact CloudCannon support.
CloudCannon also checks the Portal URL field before it connects. If the address is not valid, an error appears under the field.
- Is not an allowed host — CloudCannon cannot connect to the address in the Portal URL field. Check that the field contains your Bynder portal URL, starting with
https://.
Errors when you browse or upload assets
When Organization Members browse or upload assets on a Site linked to a Bynder DAM, they can see these errors:
- Invalid credentials or Forbidden — Bynder rejected or refused the request. Check that the Client ID and Client Secret saved for the DAM match your Bynder OAuth application, that the application has the
asset:readandasset:writescopes, and that the assigned user can access your assets and brands. - Bynder is unavailable — Bynder is temporarily unavailable. Try again later.
- Timed out waiting for Bynder to process the upload — Bynder did not finish processing an upload within about 60 seconds. Upload the file again.
If uploads to Bynder fail, or the Bynder widget shows an error or does not load your assets, check that your Bynder OAuth application has https://app.cloudcannon.com in its Set HTTP access control (CORS) field.
Contact support
If you still cannot connect, contact CloudCannon support. Include your Organization name, the name of the DAM, your Bynder portal URL, the exact error message, and when it happened. Do not send your Client Secret.