So far, we have introduced how to use components on a site and how to update them live when the front matter of a page changes. The next aspect to tackle is adding components to and removing them from a page. This is where CloudCannon Structures come into the picture.
What are Structures?#
Structures are CloudCannon's answer to structured data on static sites. You can read more about structures in Create a structure and the Structures reference. The main thing to know is that for Bookshop, Structures define the set of components that you can add to a specific key in CloudCannon.
The Bookshop specification file#
To start with CloudCannon Structures, we first need to add Bookshop specification files for our components. The Bookshop specification file for a component is created next to that component and has the same name. If you're following along with the guide, you can create an empty sample.bookshop.yml next to our sample component.
Afterward, your file structure should look like this:
src/
└─ components/
   └─ sample/
      ├─ sample.astro
      └─ sample.bookshop.yml
Similarly to the live editing setup, this file isn't required when building your site. Instead, it's picked up by the @bookshop/generate command to configure your component in CloudCannon.
Here's a bare-bones file to illustrate the main keys:
spec:
  structures:
    - content_blocks
  label: My Component

blueprint:
  text: "Hello World!"

preview:

_inputs:
The spec section names this component and tells CloudCannon where you can place this component on your site.
The blueprint section defines the data your component needs and provides the default values when a new component is created.
The preview section is used in the Bookshop component browser and doesn't affect visual editing. We can ignore this key for now.
The _inputs section is passed through as CloudCannon's input configuration,
allowing you to customize the fields specified in the blueprint.
To get things started, we'll focus on the required spec and blueprint sections.
The component spec#
The component spec controls everything about how a component is displayed in the CMS and where it can be added to a page. Let's walk through a more fleshed-out spec section:
spec:
  structures:
    - content_blocks
  label: My Component
  description: A very simple component
  icon: nature_people
The structures key tells CloudCannon where this component can be added. In this example,
we are adding this component to the set of content_blocks structures.
In practice, this means that if a content_blocks key exists anywhere on your site,
for example, in the front matter of a page, CloudCannon will give editors the option to add
the sample component to that array or object.
The label key is used as the main title of the component when selecting new components,
and browsing the existing components on a page.
The description key can help provide context when selecting a new component in CloudCannon.
The icon key is shown alongside existing components in CloudCannon, and when selecting new components.
This should be the attribute name of any Material Icon.
The component blueprint#
The component blueprint is used to generate the CloudCannon Structure for your component. This object will be used as the initial data when the component is added to a page and represents all of the editable data that your component takes.
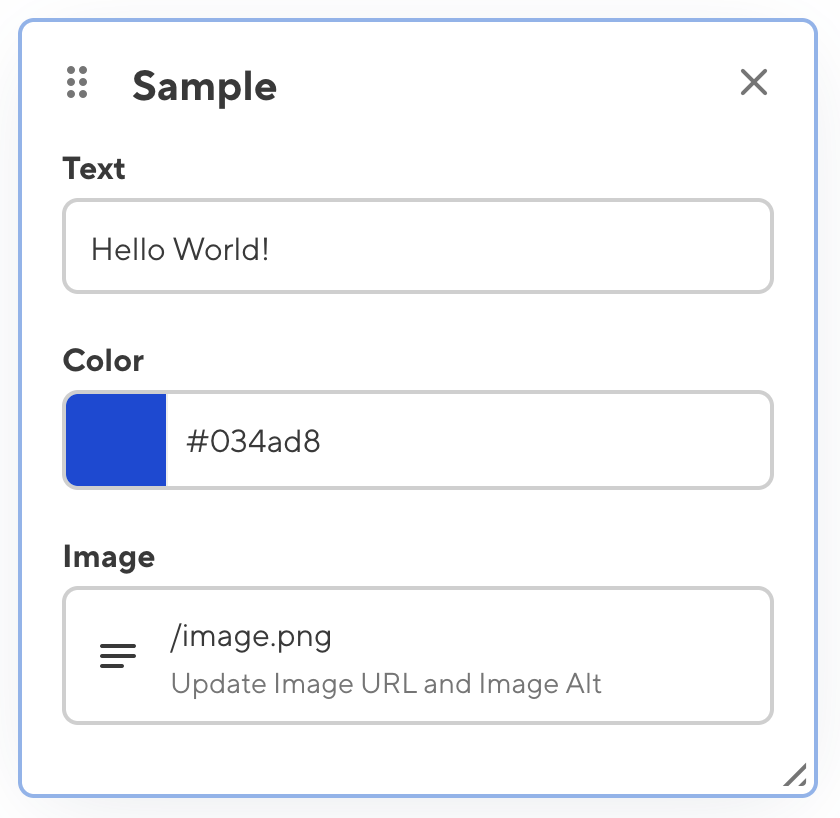
If our sample component contained the following blueprint:
blueprint:
  text: "Hello World!"
  color: "#034AD8"
  image:
    image_url: "/image.png"
    image_alt: "My alternate text"
Then creating a new sample component in CloudCannon would present us with the following data editor:
Component blueprints contain some other powerful features for helping create your Structures. We'll see those soon in the Nesting components page of this guide.
Generating and using Structures#
The npx @bookshop/generate command that we set up when configuring live editing will automatically create Structures from your Bookshop components and make them available to CloudCannon. This process happens as part of your site's build step on CloudCannon.
The Structures listed in your component's spec determine where you can add that component in CloudCannon. For a sample component tagged as:
spec:
  structures:
    - content_blocks
With the page:
---
content_blocks:
---
CloudCannon will treat content_blocks as an array and allow editors to add the sample component to it.
You can also reference Bookshop generated structures in your CloudCannon input configuration.
For example, If you wanted to create a page_components input in CloudCannon that has
access to your Bookshop structures, you could configure page_components like this:
_inputs:
  page_components:
    type: array
    options:
      structures: _structures.content_blocks
Here you may also specify type: object that will function similarly to an array with a maximum length of one.
As an object, a single component from the set of Structures can be added or removed.
Bookshop generated structures are available under the _structures key. This line sets the components available in
the page_component input to be all those assigned to the content_blocks structure in their Bookshop specification.
{
  "_inputs": {
    "page_components": {
      "type": "array",
      "options": {
        "structures": "_structures.content_blocks"
      }
    }
  }
}
Here you may also specify type: object that will function similarly to an array with a maximum length of one.
As an object, a single component from the set of Structures can be added or removed.
Bookshop generated structures are available under the _structures key. This line sets the components available in
the page_component input to be all those assigned to the content_blocks structure in their Bookshop specification.
Supported File Formats#
Bookshop supports reading component files written in yaml, toml, json, and js.
Above, we have been writing the Bookshop configuration files using YAML.
This is the recommended format, but if you prefer, you can choose another.
Can't decide? You can always run npx @bookshop/up --format <format>
to automatically convert all of your Bookshop specification files if you change your mind.