Drupal vs Jekyll + CloudCannon


There's a huge ecosystem of plugins and add-ons available for any CMS. In this comparison we'll be using the content management systems straight out of the box to reduce the complexity and time to get the sites live.
We're looking at Drupal, a powerful open source PHP CMS which has been around since 2000.
It’s the first time I’ve used Drupal so there might be better ways of doing things. If you can see an improvement, leave a comment below.
Site Overview Direct link to this section
The template we're using is called Blog which is made by Google as part of their Material Design Lite Framework.
I've made a few modifications to the theme to get it ready for our testing:
- The front page is simplified so it only shows blog posts
- There's a navigation at the top right
- I added
about.htmlwhich is a basic page with content - Instead of using classes to show the header image for the blog entries, I used inline styles so the CMS can just insert an image path
- I removed the comments section and the next/previous links on a blog entry to keep the implementation as simple as possible
You can see the static site I started each integration with in this Git repository.
The home page lists all the blog posts.

There's an about page.

And a page to view a blog post.

In this scenario I'm a web designer making a website for a non-technical client. The client needs to update the about page and manage their blog without touching any code.
Setup Direct link to this section
Drupal Direct link to this section
I'm on Mac OS X so I decided to use MAMP to set up my PHP environment. After a 240MB download I had a full PHP and MySQL environment. Next, I downloaded Drupal 7, unzipped it to the htdocs directory inside MAMP and loaded the quick installer in my browser.

The quick install involved configuring the database and other site settings for my site.
Jekyll Direct link to this section
Again, I'm using Mac OS X so Ruby is already installed. To install Jekyll I open up my terminal and type:
sudo gem install jekyllThen I can run Jekyll using:
jekyll serveDevelopment Direct link to this section
Drupal Direct link to this section
With Drupal, I made a copy of the Stark theme and read documentation on building Drupal themes. These are the files I added to the theme:
html.tpl.php: The outer most structure of the page and asset loading.
node.tpl.php: HTML structure for listing blog posts on the front page, normal pages and blog posts.
<?php if ($teaser) { ?>
  <div class="mdl-card mdl-cell mdl-cell--12-col">
      <div class="mdl-card__media mdl-color-text--grey-50" style="background-image: url('<?php echo file_create_url($content['field_image'][0]['#item']['uri']); ?>')">

        <h3><a href="<?php print $node_url; ?>"><?php print $title; ?></a></h3>
      </div>
      <div class="mdl-card__supporting-text meta mdl-color-text--grey-600">
        <div class="minilogo"></div>
        <div>
          <strong><?php echo $name ?></strong>
          <span><?php print format_interval((time() - $node->created) , 2) . t(' ago'); ?></span>
        </div>
      </div>
    </div>
<?php } elseif ($page) { ?>
  <div class="mdl-card mdl-shadow--4dp mdl-cell mdl-cell--12-col">
    <div class="mdl-card__media mdl-color-text--grey-50">
      <h3>About Me</h3>
    </div>
    <div class="mdl-color-text--grey-700 formatted-text mdl-card__supporting-text no-flex">
      <?php print render($content); ?>
    </div>
  </div>
<?php } else { ?>
  <div class="mdl-card mdl-shadow--4dp mdl-cell mdl-cell--12-col">
    <div class="mdl-card__media mdl-color-text--grey-50" style="background-image: url('<?php echo file_create_url($content['field_image'][0]['#item']['uri']); ?>')">
      <h3><?php print $title; ?></h3>
    </div>
    <div class="mdl-color-text--grey-700 mdl-card__supporting-text meta">
      <div class="minilogo"></div>
      <div>
        <strong><?php echo $name ?></strong>
        <span><?php print format_interval((time() - $node->created) , 2) . t(' ago'); ?></span>
      </div>
      <div class="section-spacer"></div>
      <div class="meta__favorites">
        425 <i class="material-icons" role="presentation">favorite</i>
        <span class="visuallyhidden">favorites</span>
      </div>
      <div>
        <i class="material-icons" role="presentation">bookmark</i>
        <span class="visuallyhidden">bookmark</span>
      </div>
      <div>
        <i class="material-icons" role="presentation">share</i>
        <span class="visuallyhidden">share</span>
      </div>
    </div>
    <div class="mdl-color-text--grey-700 formatted-text mdl-card__supporting-text">
      <?php
        hide($content['field_image']);
        hide($content['comments']);
        hide($content['links']);
        print render($content);
      ?>
    </div>
  </div>
<?php } ?>
page--front.tpl.php: Container for front page HTML. Sits between html.tpl.php and the front page code in node.tpl.php.
page.tpl.php: Container for page HTML. Sits between html.tpl.php and the page/blog entry code in node.tpl.php.
region.tpl.php: Was outputting unwanted HTML so I set it to output nothing.
<?php print $content ?>
block.tpl.php: Was outputting unwanted HTML so I set it to output nothing.
template.php: Disabled Drupal's default CSS and JavaScript files. Also customised the menu item HTML output and added external CSS and JavaScript files.
All the posts and site settings are stored in the MySQL database.
It took me a long time and a lot of reading to figure out which files to edit or where generated HTML I didn't want was coming from.
The other gotcha is each time I made an update to the template I would have to go into the Drupal admin panel to clear the cache before I could see the changes:

Jekyll Direct link to this section
Using Jekyll, most of the static HTML files remained exactly the same. I pulled out the layouts into separate files to use on multiple pages:
default.html: Contains the basic HTML structure. All other layouts use this as their parent layout.
post.html: Defines the structure of blog posts.
page.html: Defines the structure of normal pages.
Blog posts are Markdown files. The title, author, header image and other metadata is set using front matter at the top of the file:
---
layout: post
title: Shopping
author: The Newist
header_image_path: '/assets/shopping.jpg'
---

Excepteur reprehenderit sint exercitation ipsum consequat qui sit id velit elit. Velit anim eiusmod labore sit amet. Voluptate voluptate irure occaecat deserunt incididunt esse in. Sunt velit aliquip sunt elit ex nulla reprehenderit qui ut eiusmod ipsum do. Duis veniam reprehenderit laborum occaecat id proident nulla veniam. Duis enim deserunt voluptate aute veniam sint pariatur exercitation. Irure mollit est sit labore est deserunt pariatur duis aute laboris cupidatat. Consectetur consequat esse est sit veniam adipisicing ipsum enim irure.

Qui ullamco consectetur aute fugiat officia ullamco proident Lorem ad irure. Sint eu ut consectetur ut esse veniam laboris adipisicing aliquip minim anim labore commodo. Incididunt eu enim enim ipsum Lorem commodo tempor duis eu ullamco tempor elit occaecat sit. Culpa eu sit voluptate ullamco ad irure. Anim commodo aliquip cillum ea nostrud commodo id culpa eu irure ut proident. Incididunt cillum excepteur incididunt mollit exercitation fugiat in. Magna irure laborum amet non ullamco aliqua eu. Aliquip adipisicing dolore irure culpa aute enim. Ullamco quis eiusmod ipsum laboris quis qui.

Cillum ullamco eu cupidatat excepteur Lorem minim sint quis officia irure irure sint fugiat nostrud. Pariatur Lorem irure excepteur Lorem non irure ea fugiat adipisicing esse nisi ullamco proident sint. Consectetur qui quis cillum occaecat ullamco veniam et Lorem cupidatat pariatur. Labore officia ex aliqua et occaecat velit dolor deserunt minim velit mollit irure. Cillum cupidatat enim officia non velit officia labore. Ut esse nisi voluptate et deserunt enim laborum qui magna sint sunt cillum. Id exercitation labore sint ea labore adipisicing deserunt enim commodo consectetur reprehenderit enim. Est anim nostrud quis non fugiat duis cillum. Aliquip enim officia ad commodo id.
To list the blog posts in index.html, I create a for loop and reference the front matter:
---
layout: default
title: Home
---

{% for post in site.posts %}
  <div class="mdl-card mdl-cell mdl-cell--12-col">
    <div class="mdl-card__media mdl-color-text--grey-50" style="background-image: url('{{ post.header_image_path }}')">
      <h3><a href="{{ post.url }}">{{ post.title }}</a></h3>
    </div>
    <div class="mdl-card__supporting-text meta mdl-color-text--grey-600">
      <div class="minilogo"></div>
      <div>
        <strong>{{ post.author }}</strong>
        <span>{{ post.date | date: "%-d %B %Y" }}</span>
      </div>
    </div>
  </div>
{% endfor %}
Deployment Direct link to this section
Drupal Direct link to this section
For Drupal I tried two ways of deploying to a production server.
First I set up an small EC2 server with Ubuntu 14.04 in US-West-1. Then I SSHed into the server to install the PHP/MySQL environment using this guide. I downloaded Drupal, ran the installer to set up my site and configure the database. Then finally transferred my theme across and imported my development database using PHPMyAdmin.
The second way I tried was using a paid service called SiteGround. I could have used cPanel to do a one click install of Drupal but I wanted to keep the environment as close as I could to developement. I uploaded Drupal and my theme using FTP, ran the quick install, then imported my development database using PHPMyAdmin.
Overall using SiteGround saved me a lot of time as I didn't have to set up an entire PHP environment.
Jekyll Direct link to this section
I used CloudCannon to deploy and host the Jekyll site. To do this I created a GitHub repository with my source files, then connected that repository to a new site in CloudCannon.
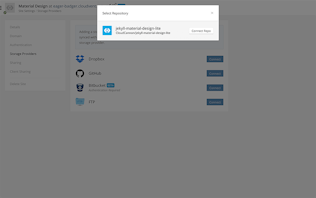
The files sync to CloudCannon and are live on a generated testing domain.
All the content is in the files so there is no database.
Updating Content Direct link to this section
Drupal Direct link to this section
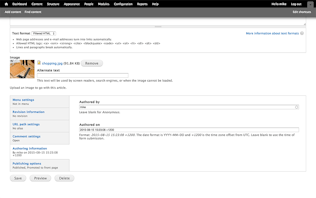
To update content in Drupal you use the admin panel. You can see existing articles and pages.
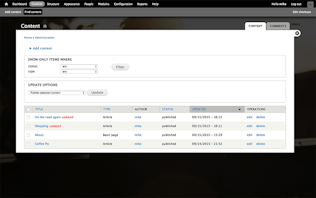
Update content using a text area.
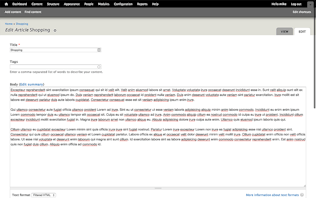
And you can update other metadata.
Jekyll Direct link to this section
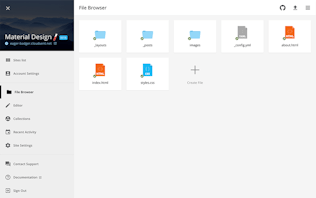
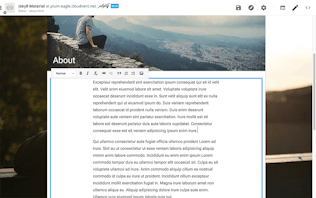
In CloudCannon, editing is inline. You can update content on the about page by clicking and entering new content.
Going to the collections view displays all the blog posts.

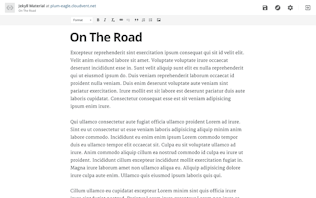
You write and update blog posts in a simple editor.
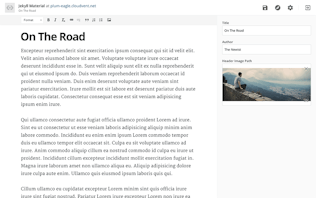
Update front matter in the settings sidebar.
All changes made on CloudCannon are committed back to the repository so I can work on the site locally in tandem.
Speed Direct link to this section
Drupal Direct link to this section
I had the following cache settings turned on and loaded the page several times to ensure everything was cached properly.
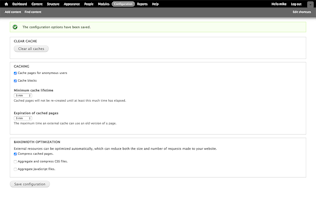
For a further speed increase, one of our readers suggested using the Boost module.
Jekyll Direct link to this section
CloudCannon serves static files and all assets are minified, optimised and delivered on a CDN.
Comparison Direct link to this section
I used a free tool from MaxCDN to compare the load times from different parts of the world.

Conclusion Direct link to this section
I felt like I was fighting against Drupal every step of the way. It was hard to take a static page and convert it into a Drupal theme, deployment took several steps, the client editing was powerful but displayed many complicated options and the end website was more than six times slower.
Jekyll was a small step from the static website, deployment was a simple git push, the editing was all inline and the website was significantly faster.
All the source files are available on GitHub:
Launch your website today
Give your content team full autonomy on your developer-approved tech stack with CloudCannon.


